Learn how to safely remove the disk from LVM. It’s useful when you need to free up disks from the volume group and re-use somewhere else or replace a faulty disk.
How to safely remove disk from LVM
This article will serve solution for below questions :
How to safely remove the disk from LVM
How to remove the disk from VG online
How to copy data from one disk to other at the physical level
How to replace a faulty disk in LVM online
How to move physical extents from one disk to another
How to free up disk from VG to shrink VG size
How to safely reduce VG
We have volume group named vg01 which has 20M logical volume created in it and mounted it on /mydata mount point. Check lsblk output below –
root@kerneltalks # lsblk
NAME         MAJ:MIN RM SIZE RO TYPE MOUNTPOINT
xvda         202:0    0  10G  0 disk
├─xvda1      202:1    0   1M  0 part
└─xvda2      202:2    0  10G  0 part /
xvdf         202:80   0   1G  0 disk
└─vg01-lvol1 253:0    0  20M  0 lvm  /mydata
Now, attach new disk of the same or bigger size of the disk /dev/xvdf. Identify the new disk on the system by using lsblk command again and comparing the output to the previous one.
root@kerneltalks # lsblk
NAME         MAJ:MIN RM SIZE RO TYPE MOUNTPOINT
xvda         202:0    0  10G  0 disk
├─xvda1      202:1    0   1M  0 part
└─xvda2      202:2    0  10G  0 part /
xvdf         202:80   0   1G  0 disk
└─vg01-lvol1 253:0    0  20M  0 lvm  /mydata
xvdg         202:96   0   1G  0 disk
You can see the new disk has been identified as /dev/xvdg. Now, we will add this disk to current VG vg01. This can be done using vgextend command. Obviously, before using it in LVM you need to run pvcreate on it.
Observe the above output. Since we created a 20M mount point from disk /dev/xvdf it has 20M less free size. The new disk /dev/xvdg is completely free.
Now, we need to move physical extents from disk xvdf to xvdg. pvmove is the command used to achieve this. You just need to supply a disk name from where you need to move out PE. Command will move PE out of that disk and write them to all available disks in the same volume group. In our case, only one other disk is available to move PE.
Move progress is shown periodically. If due to any reason operation interrupted in between then moved PE will remain at destination disks and un-moved PEs will remain on the source disk. The operation can be resumed by issuing the same command again. It will then move the remaining PE out of the source disk.
In the above command, it will run pvmove in the background. It will redirect normal console outputs in normal.log file under the current working directory whereas errors will be redirected and saved in error.log file in the current working directory.
Now if you check pvs output again, you will find all space on disk xvdf is free which means its not been used to store any data in that VG. This ensures you can remove the disk without any issues.
Before removing/detaching disk from the server, you need to remove it from LVM. You can do this by reducing VG and opting for that disk out.
root@kerneltalks # vgreduce vg01 /dev/xvdf
  Removed "/dev/xvdf" from volume group "vg01"
Now disk xvdf can be removed/detached from server safely.
Few useful switches of pvmove :
Verbose mode prints more detailed information on the operation. It can be invoked by using -v switch.
root@kerneltalks # pvmove -v /dev/xvdf
    Cluster mirror log daemon is not running.
    Wiping internal VG cache
    Wiping cache of LVM-capable devices
    Archiving volume group "vg01" metadata (seqno 17).
    Creating logical volume pvmove0
    activation/volume_list configuration setting not defined: Checking only host tags for vg01/lvol1.
    Moving 5 extents of logical volume vg01/lvol1.
    activation/volume_list configuration setting not defined: Checking only host tags for vg01/lvol1.
    Creating vg01-pvmove0
    Loading table for vg01-pvmove0 (253:1).
    Loading table for vg01-lvol1 (253:0).
    Suspending vg01-lvol1 (253:0) with device flush
    Resuming vg01-pvmove0 (253:1).
    Resuming vg01-lvol1 (253:0).
    Creating volume group backup "/etc/lvm/backup/vg01" (seqno 18).
    activation/volume_list configuration setting not defined: Checking only host tags for vg01/pvmove0.
    Checking progress before waiting every 15 seconds.
  /dev/xvdf: Moved: 0.00%
  /dev/xvdf: Moved: 100.00%
    Polling finished successfully.
The interval at which command updates the progress can be changed. -i switch followed by a number of seconds can be used to get updates from command on user-defined intervals on progress.
How to guide to boot Suse Linux from old kernel after kernel upgrade.
Boot Suse Linux from old kernel after kernel upgrade
This article is basically a how-to guide for booting SUSE Linux system from the previous kernel after the kernel upgrade process. Normally, Linux like Red Hat has the option to just change boot priority of kernel in /etc/grub.conf and reboot into the kernel of your choice. But in SUSE Linux, we do not have that option. Now the question is how to boot into old kernel once I upgrade the kernel.
You can boot into the older kernel by using the below method. I explained kernel upgrade first and then how to uninstall update to boot from the older kernel. This is a kind of rollback kernel upgrade in SUSE Linux.
1. Upgrade kernel in Suse Linux
The first thing you want to check and confirm that if your SUSE supports multiversion or not. Go to /etc/zypp/zypp.conf and make sure the below-mentioned line is not commented on. If there is # at the beginning of it, remove it.
multiversion = provides:multiversion(kernel)
There are many ways to maintain how many old kernel versions can be maintained by the system. We won’t be going through it. You can find more details about it here.
Once you are confirmed, multiversion is active then go ahead with kernel upgrade. If it’s not activated, zypper will auto-delete old kernel and you won’t be able to use it.
root@kerneltalks # uname -a
Linux kerneltalks 4.4.114-94.11-default #1 SMP Thu Feb 1 19:28:26 UTC 2018 (4309ff9) x86_64 x86_64 x86_64 GNU/Linux
Install the new kernel version using zypper. Make sure you are installing the new kernel and not updating your current one.
root@kerneltalks # zypper in kernel-default
Refreshing service 'SMT-http_smt-ec2_susecloud_net'.
Refreshing service 'cloud_update'.
Loading repository data...
Reading installed packages...
Resolving package dependencies...

The following 5 NEW packages are going to be installed:
  crash-kmp-default crda kernel-default-4.4.120-94.17.1 kernel-firmware
  wireless-regdb

5 new packages to install.
Overall download size: 81.3 MiB. Already cached: 0 B. After the operation,
additional 358.3 MiB will be used.
Continue? [y/n/...? shows all options] (y): y
Retrieving package kernel-default-4.4.120-94.17.1.x86_64
                                           (1/5),  38.6 MiB (167.2 MiB unpacked)
Retrieving: kernel-default-4.4.120-94.17.1.x86_64.rpm ........[done (7.1 MiB/s)]
Retrieving package kernel-firmware-20170530-21.19.1.noarch
                                           (2/5),  42.5 MiB (191.1 MiB unpacked)
Retrieving: kernel-firmware-20170530-21.19.1.noarch.rpm .....[done (18.2 MiB/s)]
Retrieving package wireless-regdb-2017.12.23-4.3.1.noarch
                                           (3/5),  14.1 KiB ( 13.0 KiB unpacked)
Retrieving: wireless-regdb-2017.12.23-4.3.1.noarch.rpm ...................[done]
Retrieving package crash-kmp-default-7.1.8_k4.4.92_6.30-4.6.2.x86_64
                                           (4/5), 116.8 KiB (  7.8 KiB unpacked)
Retrieving: crash-kmp-default-7.1.8_k4.4.92_6.30-4.6.2.x86_64.rpm ........[done]
Retrieving package crda-1.1.3-4.2.1.x86_64 (5/5),  14.4 KiB ( 34.5 KiB unpacked)
Retrieving: crda-1.1.3-4.2.1.x86_64.rpm ..................................[done]
Checking for file conflicts: .............................................[done]
(1/5) Installing: kernel-default-4.4.120-94.17.1.x86_64 ..................[done]
Additional rpm output:
Creating initrd: /boot/initrd-4.4.120-94.17-default
dracut: Executing: /usr/bin/dracut --logfile /var/log/YaST2/mkinitrd.log --force                                                                                         /boot/initrd-4.4.120-94.17-default 4.4.120-94.17-default
dracut: dracut module 'btrfs' will not be installed, because command 'btrfs' cou                                                                                        ld not be found!
dracut: dracut module 'dmraid' will not be installed, because command 'dmraid' c                                                                                        ould not be found!
dracut: dracut module 'mdraid' will not be installed, because command 'mdadm' co                                                                                        uld not be found!
dracut: *** Including module: bash ***
dracut: *** Including module: systemd ***
dracut: *** Including module: systemd-initrd ***
dracut: *** Including module: i18n ***
dracut: No KEYMAP configured.
dracut: *** Including module: xen-tools-domU ***
dracut: *** Including module: kernel-modules ***
dracut: *** Including module: rootfs-block ***
dracut: *** Including module: suse-xfs ***
dracut: *** Including module: terminfo ***
dracut: *** Including module: udev-rules ***
dracut: Skipping udev rule: 40-redhat.rules
dracut: Skipping udev rule: 50-firmware.rules
dracut: Skipping udev rule: 50-udev.rules
dracut: Skipping udev rule: 91-permissions.rules
dracut: Skipping udev rule: 80-drivers-modprobe.rules
dracut: *** Including module: dracut-systemd ***
dracut: *** Including module: haveged ***
dracut: *** Including module: usrmount ***
dracut: *** Including module: base ***
dracut: *** Including module: fs-lib ***
dracut: *** Including module: shutdown ***
dracut: *** Including module: suse ***
dracut: *** Including modules done ***
dracut: *** Installing kernel module dependencies and firmware ***
dracut: *** Installing kernel module dependencies and firmware done ***
dracut: *** Resolving executable dependencies ***
dracut: *** Resolving executable dependencies done***
dracut: *** Hardlinking files ***
dracut: *** Hardlinking files done ***
dracut: *** Stripping files ***
dracut: *** Stripping files done ***
dracut: *** Generating early-microcode cpio image ***
dracut: *** Store current command line parameters ***
dracut: Stored kernel commandline:
dracut:  root=UUID=26fa33a2-ad40-4a85-a495-402aca6a2127 rootfstype=ext4 rootflag                                                                                        s=rw,relatime,data=ordered
dracut: *** Creating image file '/boot/initrd-4.4.120-94.17-default' ***
dracut: *** Creating initramfs image file '/boot/initrd-4.4.120-94.17-default' d                                                                                        one ***


(2/5) Installing: kernel-firmware-20170530-21.19.1.noarch ................[done]
(3/5) Installing: wireless-regdb-2017.12.23-4.3.1.noarch .................[done]
(4/5) Installing: crash-kmp-default-7.1.8_k4.4.92_6.30-4.6.2.x86_64 ......[done]
(5/5) Installing: crda-1.1.3-4.2.1.x86_64 ................................[done]
Output of kernel-firmware-20170530-21.19.1.noarch.rpm %posttrans script:
    Creating initrd: /boot/initrd-4.4.114-94.11-default
    dracut: Executing: /usr/bin/dracut --logfile /var/log/YaST2/mkinitrd.log --f                                                                                        orce /boot/initrd-4.4.114-94.11-default 4.4.114-94.11-default
    dracut: dracut module 'btrfs' will not be installed, because command 'btrfs'                                                                                         could not be found!
    dracut: dracut module 'dmraid' will not be installed, because command 'dmrai                                                                                        d' could not be found!
    dracut: dracut module 'mdraid' will not be installed, because command 'mdadm                                                                                        ' could not be found!
    dracut: *** Including module: bash ***
    dracut: *** Including module: systemd ***
    dracut: *** Including module: systemd-initrd ***
    dracut: *** Including module: i18n ***
    dracut: No KEYMAP configured.
    dracut: *** Including module: xen-tools-domU ***
    dracut: *** Including module: kernel-modules ***
    dracut: *** Including module: rootfs-block ***
    dracut: *** Including module: suse-xfs ***
    dracut: *** Including module: terminfo ***
    dracut: *** Including module: udev-rules ***
    dracut: Skipping udev rule: 40-redhat.rules
    dracut: Skipping udev rule: 50-firmware.rules
    dracut: Skipping udev rule: 50-udev.rules
    dracut: Skipping udev rule: 91-permissions.rules
    dracut: Skipping udev rule: 80-drivers-modprobe.rules
    dracut: *** Including module: dracut-systemd ***
    dracut: *** Including module: haveged ***
    dracut: *** Including module: usrmount ***
    dracut: *** Including module: base ***
    dracut: *** Including module: fs-lib ***
    dracut: *** Including module: shutdown ***
    dracut: *** Including module: suse ***
    dracut: *** Including modules done ***
    dracut: *** Installing kernel module dependencies and firmware ***
    dracut: *** Installing kernel module dependencies and firmware done ***
    dracut: *** Resolving executable dependencies ***
    dracut: *** Resolving executable dependencies done***
    dracut: *** Hardlinking files ***
    dracut: *** Hardlinking files done ***
    dracut: *** Stripping files ***
    dracut: *** Stripping files done ***
    dracut: *** Generating early-microcode cpio image ***
    dracut: *** Store current command line parameters ***
    dracut: Stored kernel commandline:
    dracut:  root=UUID=26fa33a2-ad40-4a85-a495-402aca6a2127 rootfstype=ext4 root                                                                                        flags=rw,relatime,data=ordered
    dracut: *** Creating image file '/boot/initrd-4.4.114-94.11-default' ***
    dracut: *** Creating initramfs image file '/boot/initrd-4.4.114-94.11-defaul                                                                                        t' done ***
    Creating initrd: /boot/initrd-4.4.120-94.17-default
    dracut: Executing: /usr/bin/dracut --logfile /var/log/YaST2/mkinitrd.log --f                                                                                        orce /boot/initrd-4.4.120-94.17-default 4.4.120-94.17-default
    dracut: dracut module 'btrfs' will not be installed, because command 'btrfs'                                                                                         could not be found!
    dracut: dracut module 'dmraid' will not be installed, because command 'dmrai                                                                                        d' could not be found!
    dracut: dracut module 'mdraid' will not be installed, because command 'mdadm                                                                                        ' could not be found!
    dracut: *** Including module: bash ***
    dracut: *** Including module: systemd ***
    dracut: *** Including module: systemd-initrd ***
    dracut: *** Including module: i18n ***
    dracut: No KEYMAP configured.
    dracut: *** Including module: xen-tools-domU ***
    dracut: *** Including module: kernel-modules ***
    dracut: *** Including module: rootfs-block ***
    dracut: *** Including module: suse-xfs ***
    dracut: *** Including module: terminfo ***
    dracut: *** Including module: udev-rules ***
    dracut: Skipping udev rule: 40-redhat.rules
    dracut: Skipping udev rule: 50-firmware.rules
    dracut: Skipping udev rule: 50-udev.rules
    dracut: Skipping udev rule: 91-permissions.rules
    dracut: Skipping udev rule: 80-drivers-modprobe.rules
    dracut: *** Including module: dracut-systemd ***
    dracut: *** Including module: haveged ***
    dracut: *** Including module: usrmount ***
    dracut: *** Including module: base ***
    dracut: *** Including module: fs-lib ***
    dracut: *** Including module: shutdown ***
    dracut: *** Including module: suse ***
    dracut: *** Including modules done ***
    dracut: *** Installing kernel module dependencies and firmware ***
    dracut: *** Installing kernel module dependencies and firmware done ***
    dracut: *** Resolving executable dependencies ***
    dracut: *** Resolving executable dependencies done***
    dracut: *** Hardlinking files ***
    dracut: *** Hardlinking files done ***
    dracut: *** Stripping files ***
    dracut: *** Stripping files done ***
    dracut: *** Generating early-microcode cpio image ***
    dracut: *** Store current command line parameters ***
    dracut: Stored kernel commandline:
    dracut:  root=UUID=26fa33a2-ad40-4a85-a495-402aca6a2127 rootfstype=ext4 root                                                                                        flags=rw,relatime,data=ordered
    dracut: *** Creating image file '/boot/initrd-4.4.120-94.17-default' ***
    dracut: *** Creating initramfs image file '/boot/initrd-4.4.120-94.17-defaul                                                                                        t' done ***
Reboot system and you see your system is booted with the latest new kernel.
root@kerneltalks # uname -a
Linux kerneltalks 4.4.120-94.17-default #1 SMP Wed Mar 14 17:23:00 UTC 2018                                                                                         (cf3a7bb) x86_64 x86_64 x86_64 GNU/Linux
Now check all the installed kernel packages on your system using –
root@kerneltalks # zypper se -si 'kernel*'
Refreshing service 'SMT-http_smt-ec2_susecloud_net'.
Refreshing service 'cloud_update'.
Loading repository data...
Reading installed packages...

S  | Name            | Type    | Version          | Arch   | Repository
---+-----------------+---------+------------------+--------+-------------------
i+ | kernel-default  | package | 4.4.120-94.17.1  | x86_64 | SLES12-SP3-Updates
i+ | kernel-default  | package | 4.4.114-94.11.3  | x86_64 | SLES12-SP3-Updates
i  | kernel-firmware | package | 20170530-21.19.1 | noarch | SLES12-SP3-Updates
Here, you can see there are two kernels installed on the system. Old one is 4.4.114-94.11.3 and the new one is 4.4.120-94.17.1 from which the current system is booted.
2. Boot from the old kernel in SUSE Linux
For Suse with GRUB2
Now, if you want to boot the system from the old kernel 4.4.114-94.11.3 without un-installing new kernel then follow the below steps.
Make copy of /etc/default/grub file as a backup. and then edit it –
root@kerneltalks # cp /etc/default/grub /etc/default/grub.backup
root@kerneltalks # vi /etc/default/grub
Look for GRUB_DEFAULT=0and edit the number per old kernel menu number. Old kernel menu number can be found in /boot/grub2/grub.cfg
Open /boot/grub2/grub.cfg and look for entry menuentry You will be able to see different kernel entries in it. First being 0 and then counter goes on. Check and choose the menu number of your old kernel.
After editing /etc/default/grub file you need to re-create /boot/grub2/grub.cfg You can do it with below command –
root@kerneltalks # grub2-mkconfig -o /boot/grub2/grub.cfg
Generating grub configuration file ...
Found linux image: /boot/vmlinuz-4.4.120-94.17-default
Found initrd image: /boot/initrd-4.4.120-94.17-default
Found linux image: /boot/vmlinuz-4.4.114-94.11-default
Found initrd image: /boot/initrd-4.4.114-94.11-default
done
Once done, reboot the system. That’s it. You can see your system is booted with an old kernel while your new kernel is still installed on the server.
For Suse with GRUB
Edit /boot/grub/grub.conf which is also link to /boot/grub/menu.lst . Look for parameter default 0 and change the number 0 to your desired kernel menu number.
You can see the kernel list to be displayed later in the same file. Remember, the numbering starts at 0. So countdown to your old kernel version number and use it for the default parameter.
Save the file and reboot the system. You will be booted with old kernel.
3. Rollback to old kernel in SUSE Linux
Now if you want to rollback system to the old kernel 4.4.114-94.11.3, remove this latest installed kernel 4.4.120-94.17.1. You need to give kernel name as <package_name>-<package_version>. You can get the version from the above command output. In this way, we are downgrading kernel in SUSE Linux.
root@kerneltalks # zypper rm kernel-default-4.4.120-94.17.1
Loading repository data...
Reading installed packages...
Resolving package dependencies...

The following package is going to be REMOVED:
  kernel-default-4.4.120-94.17.1

1 package to remove.
After the operation, 167.2 MiB will be freed.
Continue? [y/n/...? shows all options] (y): y
(1/1) Removing kernel-default-4.4.120-94.17.1.x86_64 .............................................................................................................[done]
There are some running programs that might use files deleted by recent upgrade. You may wish to check and restart some of them. Run 'zypper ps -s' to list these programs.
Now as per warning lets check which all processes are using it.
root@kerneltalks # zypper ps -s
The following running processes use deleted files:

PID | PPID | UID | User | Command       | Service
----+------+-----+------+---------------+--------------
486 | 1    | 0   | root | systemd-udevd | systemd-udevd

You may wish to restart these processes.
See 'man zypper' for information about the meaning of values in the above table.
Lets reboot system and check kernel version.
root@kerneltalks # uname -a
Linux kerneltalks 4.4.114-94.11-default #1 SMP Thu Feb 1 19:28:26 UTC 2018 (4309ff9) x86_64 x86_64 x86_64 GNU/Linux
You can see the system is booted with your old kernel 4.4.114-94.11.3!
Now, Check installed kernel packages and you can see a newer kernel package is no more installed/active on the system.
root@kerneltalks # zypper se -si 'kernel*'
Refreshing service 'SMT-http_smt-ec2_susecloud_net'.
Refreshing service 'cloud_update'.
Loading repository data...
Reading installed packages...

S  | Name            | Type    | Version          | Arch   | Repository
---+-----------------+---------+------------------+--------+-------------------
i+ | kernel-default  | package | 4.4.114-94.11.3  | x86_64 | SLES12-SP3-Updates
i  | kernel-firmware | package | 20170530-21.19.1 | noarch | SLES12-SP3-Updates
If you have another method (command line) to boot into the older kernel then please share in the comments below.
Solution for VMware tools not running after Linux kernel upgrade in guest VM
VMware tools not running after Linux kernel upgrade
In this article, we will discuss solutions when VMware tools are not running after the Linux kernel upgrade.
Cause :
After kernel upgrade in the Guest VM Linux machine, you may see VMware tools are not running. This is because there are VMware tools modules that runs using kernel library files. After a kernel upgrade, they point to different library files than the one currently used by the kernel and hence failed to start.
Solution :
The issue can be resolved by reconfiguring VMware tools after the kernel upgrade. This process is on the fly and does not require downtime.
Login to Guest Linux operating system using root account and run reconfiguration script /usr/bin/vmware-config-tools.pl
You will be asked a few choices to make. If you know about those modules you choose your answers according to your requirement and just hit enter to accept defaults. See below sample output –
root@kerneltalks # /usr/bin/vmware-config-tools.pl
Initializing...
Making sure services for VMware Tools are stopped.
Found a compatible pre-built module for vmci.  Installing it...
Found a compatible pre-built module for vsock.  Installing it...
The module vmxnet3 has already been installed on this system by another
installer or package and will not be modified by this installer.

The module pvscsi has already been installed on this system by another
installer or package and will not be modified by this installer.

The module vmmemctl has already been installed on this system by another
installer or package and will not be modified by this installer.

The VMware Host-Guest Filesystem allows for shared folders between the host OS
and the guest OS in a Fusion or Workstation virtual environment.  Do you wish
to enable this feature? [no]

Found a compatible pre-built module for vmxnet.  Installing it...


The vmblock enables dragging or copying files between host and guest in a
Fusion or Workstation virtual environment.  Do you wish to enable this feature?
[no]

VMware automatic kernel modules enables automatic building and installation of
VMware kernel modules at boot that are not already present. This feature can
be enabled/disabled by re-running vmware-config-tools.pl.

Would you like to enable VMware automatic kernel modules?
[no]

Do you want to enable Guest Authentication (vgauth)? Enabling vgauth is needed
if you want to enable Common Agent (caf). [yes]

Do you want to enable Common Agent (caf)? [yes]

No X install found.

Creating a new initrd boot image for the kernel.

NOTE: both /etc/vmware-tools/GuestProxyData/server/key.pem and
      /etc/vmware-tools/GuestProxyData/server/cert.pem already exist.
      They are not generated again. To regenerate them by force,
      use the "vmware-guestproxycerttool -g -f" command.

vmware-tools start/running
The configuration of VMware Tools 10.0.6 build-3560309 for Linux for this
running kernel completed successfully.

You must restart your X session before any mouse or graphics changes take
effect.

You can now run VMware Tools by invoking "/usr/bin/vmware-toolbox-cmd" from the
command line.

To enable advanced X features (e.g., guest resolution fit, drag and drop, and
file and text copy/paste), you will need to do one (or more) of the following:
1. Manually start /usr/bin/vmware-user
2. Log out and log back into your desktop session; and,
3. Restart your X session.

Enjoy,

--the VMware team
If you are ok to accept the default and want the script to run non-interactive, run it with -d default switch.
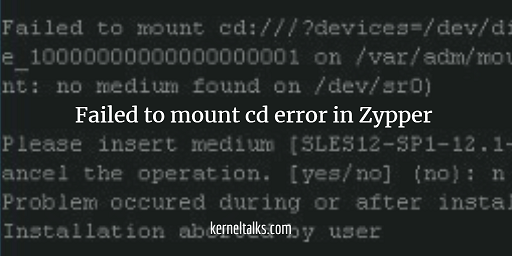
Failed to mount cd:///?devices=/dev/disk/by-id/ata-VMware_Virtual_IDE_CDROM_Drive_10000000000000000001 on /var/adm/mount/AP_0xFre2nn: Mounting media failed (mount: no medium found on /dev/sr0)
Detailed error snippet below :
# zypper in salt-minion
Loading repository data...
Reading installed packages...
Resolving package dependencies...

The following 16 NEW packages are going to be installed:
  libzmq3 python-Jinja2 python-MarkupSafe python-PyYAML python-backports.ssl_match_hostname python-futures python-msgpack-python python-netaddr python-psutil
  python-pycrypto python-pyzmq python-requests python-simplejson python-tornado salt salt-minion

The following 2 recommended packages were automatically selected:
  python-futures python-netaddr

The following 15 packages are not supported by their vendor:
  libzmq3 python-Jinja2 python-MarkupSafe python-PyYAML python-backports.ssl_match_hostname python-futures python-msgpack-python python-psutil python-pycrypto
  python-pyzmq python-requests python-simplejson python-tornado salt salt-minion

16 new packages to install.
Overall download size: 9.0 MiB. Already cached: 0 B. After the operation, additional 48.0 MiB will be used.
Continue? [y/n/? shows all options] (y): y
Retrieving package python-netaddr-0.7.10-8.5.noarch                                                                       (1/16), 896.9 KiB (  4.2 MiB unpacked)
Failed to mount cd:///?devices=/dev/disk/by-id/ata-VMware_Virtual_IDE_CDROM_Drive_10000000000000000001 on /var/adm/mount/AP_0xFre2nn: Mounting media failed (mount: no medium found on /dev/sr0)

Please insert medium [SLES12-SP1-12.1-0] #1 and type 'y' to continue or 'n' to cancel the operation. [yes/no] (no): n
Problem occured during or after installation or removal of packages:
Installation aborted by user

Please see the above error message for a hint.
Cause :
This error is nothing but zypper trying to read repo information from CD/DVD. Since one of the zypper repo is configured to look for mountable media, it’s doing its job. But, currently, that media is not connected to the system, and hence zypper is failing to read details from it.
Solution :
List your zypper repo using the command :
# zypper lr --details
# | Alias                | Name                 | Enabled | GPG Check | Refresh | Priority | Type   | URI                                                                                    | Service
--+----------------------+----------------------+---------+-----------+---------+----------+--------+----------------------------------------------------------------------------------------+--------
1 | SLES12-SP1-12.1-0    | SLES12-SP1-12.1-0    | Yes     | (r ) Yes  | No      |   99     | yast2  | cd:///?devices=/dev/disk/by-id/ata-VMware_Virtual_IDE_CDROM_Drive_10000000000000000001 |
2 | sles12-sp1-bootstrap | sles12-sp1-bootstrap | Yes     | ( p) Yes  | No      |   99     | rpm-md | http://repo.kerneltalks.com/pub/repositories/sle/12/1/bootstrap                 |
Here you can see first repo’s URI is pointing to a CD. Now you can mount the CD or you can disable that repo for time being and move ahead with the installation.
Use the below command to disable CD repo. Make sure you enter correct repo number in command (here it’s 1)
# zypper mr --disable 1
Repository 'SLES12-SP1-12.1-0' has been successfully disabled.
Once CD/DVD repo is disabled successfully, re-run zypper installation command and you will be able to execute it without any errors!
-r switch gives you your current kernel version. -v gives you your current patch level. You can see in the above output our RHEL6 system has 2014 (almost 4 years old) patched kernel. We will patch it to the latest one in this article.
How to upgrade the kernel in RHEL
Patching kernel is Linux is the same as upgrading to the latest kernel. Make sure you have yum configured properly to receive the latest packages from trusted repositories. If you do not have/want yum configurations, you can download the latest kernel and its dependencies from the Red Hat portal and keep it ready on the server for installation.
Never replace the existing kernel by updating the package. Always install a new kernel package so that your old kernel still resides on the server and you can boot it if your server/application is not behaving well with the new kernel.
To install the latest kernel, use rpm -ivh <rpm names> or yum install kernel command.
root@kerneltalks # yum install kernel
Loaded plugins: amazon-id, rhui-lb, security
Setting up Install Process
Resolving Dependencies
--> Running transaction check
---> Package kernel.x86_64 0:2.6.32-696.20.1.el6 will be installed
--> Processing Dependency: dracut-kernel >= 004-408.el6 for package: kernel-2.6.32-696.20.1.el6.x86_64
--> Processing Dependency: kernel-firmware >= 2.6.32-696.20.1.el6 for package: kernel-2.6.32-696.20.1.el6.x86_64
--> Running transaction check
---> Package dracut-kernel.noarch 0:004-336.el6_5.2 will be updated
---> Package dracut-kernel.noarch 0:004-409.el6_8.2 will be an update
--> Processing Dependency: dracut = 004-409.el6_8.2 for package: dracut-kernel-004-409.el6_8.2.noarch
---> Package kernel-firmware.noarch 0:2.6.32-431.29.2.el6 will be updated
---> Package kernel-firmware.noarch 0:2.6.32-696.20.1.el6 will be an update
--> Running transaction check
---> Package dracut.noarch 0:004-336.el6_5.2 will be updated
---> Package dracut.noarch 0:004-409.el6_8.2 will be an update
--> Finished Dependency Resolution

Dependencies Resolved

========================================================================================================================================================================
 Package                              Arch                        Version                                   Repository                                             Size
========================================================================================================================================================================
Installing:
 kernel                               x86_64                      2.6.32-696.20.1.el6                       rhui-REGION-rhel-server-releases                       32 M
Updating for dependencies:
 dracut                               noarch                      004-409.el6_8.2                           rhui-REGION-rhel-server-releases                      127 k
 dracut-kernel                        noarch                      004-409.el6_8.2                           rhui-REGION-rhel-server-releases                       28 k
 kernel-firmware                      noarch                      2.6.32-696.20.1.el6                       rhui-REGION-rhel-server-releases                       29 M

Transaction Summary
========================================================================================================================================================================
Install       1 Package(s)
Upgrade       3 Package(s)

Total download size: 61 M
Is this ok [y/N]: y
Downloading Packages:
(1/4): dracut-004-409.el6_8.2.noarch.rpm                                                                                                         | 127 kB     00:00
(2/4): dracut-kernel-004-409.el6_8.2.noarch.rpm                                                                                                  |  28 kB     00:00
(3/4): kernel-2.6.32-696.20.1.el6.x86_64.rpm                                                                                                     |  32 MB     00:00
(4/4): kernel-firmware-2.6.32-696.20.1.el6.noarch.rpm                                                                                            |  29 MB     00:00
------------------------------------------------------------------------------------------------------------------------------------------------------------------------
Total                                                                                                                                    45 MB/s |  61 MB     00:01
Running rpm_check_debug
Running Transaction Test
Transaction Test Succeeded
Running Transaction
  Updating   : dracut-004-409.el6_8.2.noarch                                                                                                                        1/7
  Updating   : dracut-kernel-004-409.el6_8.2.noarch                                                                                                                 2/7
  Updating   : kernel-firmware-2.6.32-696.20.1.el6.noarch                                                                                                           3/7
  Installing : kernel-2.6.32-696.20.1.el6.x86_64                                                                                                                    4/7
  Cleanup    : dracut-kernel-004-336.el6_5.2.noarch                                                                                                                 5/7
  Cleanup    : dracut-004-336.el6_5.2.noarch                                                                                                                        6/7
  Cleanup    : kernel-firmware-2.6.32-431.29.2.el6.noarch                                                                                                           7/7
  Verifying  : kernel-firmware-2.6.32-696.20.1.el6.noarch                                                                                                           1/7
  Verifying  : kernel-2.6.32-696.20.1.el6.x86_64                                                                                                                    2/7
  Verifying  : dracut-kernel-004-409.el6_8.2.noarch                                                                                                                 3/7
  Verifying  : dracut-004-409.el6_8.2.noarch                                                                                                                        4/7
  Verifying  : dracut-004-336.el6_5.2.noarch                                                                                                                        5/7
  Verifying  : kernel-firmware-2.6.32-431.29.2.el6.noarch                                                                                                           6/7
  Verifying  : dracut-kernel-004-336.el6_5.2.noarch                                                                                                                 7/7

Installed:
  kernel.x86_64 0:2.6.32-696.20.1.el6

Dependency Updated:
  dracut.noarch 0:004-409.el6_8.2                  dracut-kernel.noarch 0:004-409.el6_8.2                  kernel-firmware.noarch 0:2.6.32-696.20.1.el6

Complete!
If you are on a test system and don’t mind wiping out old kernel then you can directly use yum update kernel or rpm -Uvh <rpms> command and update kernel.
If you observe, yum resolved dependencies too. If you are opting to install from rpm you need to download all dependencies as well. Here is the list of dependencies depending on your RHEL version :
Now, if you observe,/boot/grub/grub.conf your newly installed kernel entry is added before your old kernel entry. This gives new kernel priority to boot when you reboot the system. parameter default=0 says the system needs to be booted from the very first kernel defined below. Kernel entries numbering starts from 0. Make sure this parameter value points to your newly installed kernel and reboot the system.
# cat /boot/grub/grub.conf
default=0
timeout=1
splashimage=(hd0,0)/boot/grub/splash.xpm.gz
hiddenmenu
title Red Hat Enterprise Linux Server (2.6.32-696.20.1.el6.x86_64)
        root (hd0,0)
        kernel /boot/vmlinuz-2.6.32-696.20.1.el6.x86_64 console=ttyS0 ro root=UUID=9996863e-b964-47d3-a33b-3920974fdbd9 rd_NO_LUKS  KEYBOARDTYPE=pc KEYTABLE=us LANG=en_US.UTF-8 xen_blkfront.sda_is_xvda=1 console=ttyS0,115200n8 console=tty0 rd_NO_MD SYSFONT=latarcyrheb-sun16 crashkernel=auto rd_NO_LVM rd_NO_DM
        initrd /boot/initramfs-2.6.32-696.20.1.el6.x86_64.img
title Red Hat Enterprise Linux (2.6.32-431.29.2.el6.x86_64)
        root (hd0,0)
        kernel /boot/vmlinuz-2.6.32-431.29.2.el6.x86_64 console=ttyS0 ro root=UUID=9996863e-b964-47d3-a33b-3920974fdbd9 rd_NO_LUKS  KEYBOARDTYPE=pc KEYTABLE=us LANG=en_US.UTF-8 xen_blkfront.sda_is_xvda=1 console=ttyS0,115200n8 console=tty0 rd_NO_MD SYSFONT=latarcyrheb-sun16 crashkernel=auto rd_NO_LVM rd_NO_DM
        initrd /boot/initramfs-2.6.32-431.29.2.el6.x86_64.img
After rebooting, you can see your system is running with a new updated kernel!
root@kerneltalks # reboot

Broadcast message from root@kerneltalks
        (/dev/pts/0) at 2:14 ...

The system is going down for reboot NOW!

root@kerneltalks # uname -r
2.6.32-696.20.1.el6.x86_64
root@kerneltalks # uname -v
#1 SMP Fri Jan 12 15:07:59 EST 2018
You can see kernel is upgraded from 2.6.32-431.29.2.el6.x86_64 to 2.6.32-696.20.1.el6.x86_64. And patch level from July 2014 to Jan 2018.
How to upgrade the kernel in Suse Linux
Let’s start with checking current kernel version and patch info.
root@kerneltalks # uname -r
3.0.101-108.21-default
root@kerneltalks # uname -v
#1 SMP Fri Dec 29 10:25:37 UTC 2017 (5f5299b)
Perform kernel upgrade with zypper or if you have kernel rpm package with you, you can use rpm -ivh <kernel_rpm_path> to perform the multi-kernel install (not update)
You have an option to perform distribution upgrade using zypper dup as well which includes updating all packages to available updates. But most of the cases it’s not recommended.
# zypper up kernel-default
Refreshing service 'cloud_update'.
Loading repository data...
Reading installed packages...
Resolving package dependencies...

The following packages are going to be upgraded:
  kernel-default kernel-default-base

2 packages to upgrade.
Overall download size: 40.2 MiB. After the operation, additional 1.2 MiB will be used.
Continue? [y/n/? shows all options] (y): y
Retrieving package kernel-default-base-3.0.101-108.35.1.x86_64 (1/2), 15.7 MiB (23.2 MiB unpacked)
Retrieving: kernel-default-base-3.0.101-108.35.1.x86_64.rpm [done]
Retrieving package kernel-default-3.0.101-108.35.1.x86_64 (2/2), 24.5 MiB (86.1 MiB unpacked)
Retrieving: kernel-default-3.0.101-108.35.1.x86_64.rpm [done]
Installing: kernel-default-base-3.0.101-108.35.1 [done]
Additional rpm output:

Kernel image:   /boot/vmlinuz-3.0.101-108.35-default
Initrd image:   /boot/initrd-3.0.101-108.35-default
Root device:    /dev/hda1 (mounted on / as ext3)
Kernel Modules: xen-platform-pci xen-vbd-upstream xen-vbd xen-balloon xen-vnif scsi_mod libata ata_piix jbd mbcache ext3 edd usb-common usbcore ehci-hcd ohci-hcd uhci-hcd xhci-hcd crc-t10dif sd_mod
Features:       acpi fv_guest block resume.userspace resume.kernel
32723 blocks


Installing: kernel-default-3.0.101-108.35.1 [done]
Additional rpm output:

Kernel image:   /boot/vmlinuz-3.0.101-108.35-default
Initrd image:   /boot/initrd-3.0.101-108.35-default
Root device:    /dev/hda1 (mounted on / as ext3)
Kernel Modules: hwmon thermal_sys thermal processor fan xen-platform-pci xen-vbd-upstream xen-vbd xen-balloon xen-vnif scsi_mod libata ata_piix ata_generic jbd mbcache ext3 edd usb-common usbcore ehci-hcd ohci-hcd uhci-hcd xhci-hcd hid usbhid crc-t10dif sd_mod
Features:       acpi fv_guest block usb resume.userspace resume.kernel
33630 blocks

# reboot
Broadcast message from root (pts/0) (Sat Mar  3 04:47:12 2018):

The system is going down for reboot NOW!
Reboot the system and then check new kernel version.
# uname -r
3.0.101-108.35-default
# uname -v
#1 SMP Mon Feb 19 21:13:08 UTC 2018 (251ec24)
You can see the kernel is upgraded from 3.0.101-108.21-default to 3.0.101-108.35-default. And patch date from Dec 2017 to Feb 2018!
How to upgrade the kernel in Ubuntu Linux
Start with checking your current kernel version and patching date
# uname -v
#16-Ubuntu SMP Fri Jan 20 15:31:12 UTC 2017
# uname -r
4.9.0-15-generic
Now visit the Ubuntu Kernel page and download the kernel of your choice which is matching with your server arch using wget. We chose to upgrade to 4.10 kernel. Since we have generic kernel we downloaded generic kernel files from 4.10 directory.
TorGuard VPN review! TorGuard offers VPN services backed by solid 3000+ server infrastructure spread across 50 countries. Read more about TorGuard VPN, features, and pricing.
TorGuard review
Review for TorGuard VPN services: The best tool to secure your web traffic. TorGuard is a leading firm in VPN services with the tagline ‘Don’t Risk Your Online Privacy. Go Stealth with TorGuard‘. So let’s get our hands on TorGuard VPN and see its features. But first let’s try to figure out, what is VPN? why VPN? and why do I need my web traffic secured?
VPN is a short form of Virtual Private Network. It’s about privacy. In today’s world, data is everything. Big companies, businesses always look for data to analyze and decide business strategy. Public domain data is gathered from internet traffic. If you are connected to free wifi then there are maximum chances your internet traffic is being monitored and maybe being sold to such companies. So online privacy is a key area to focus on these days. That’s where a VPN comes into the picture. VPN creates a secure tunnel between you and the VPN server. All your internet traffic will be routed through this tunnel and then to the internet from the VPN server. This way you keep your anonymity online and no middleman can intercept/ snoop your internet traffic.
TorGuard VPN
Now we know little basic about VPN, let’s get our hands on TorGuard VPN. To use TorGuard VPN you have plenty of options depending on which device you want to use on. They have windows, Linux, MAC OS software setups. They also have Android, iOS apps, Mozilla, Chrome browser extensions & router setup scripts. All these downloads can be explored on their download page. Another cool way to connect TorGuard is by using the Cisco AnyConnect client. Here is a small guide by TorGuard to set up the Cisco AnyConnect clients to use their services.
TorGuard VPN chrome extension
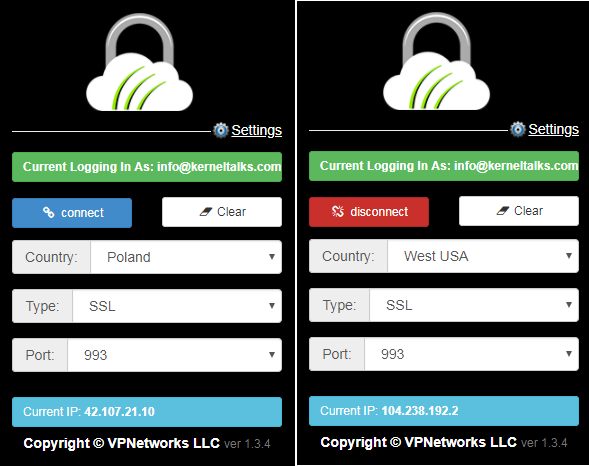
For quick hands-on, we are using the Chrome Browser extension. The extension is available in the Chrome store here. After installing you will be asked for login credentials.
You have an option to save your credentials so that you need not enter them every time you connect. You also have an option to select a country from which your VPN server will be selected to connect you to the internet. Connection type by default SSL since you want to secure connection but HTTP protocol is also available if you choose to. It also offers port selection if you opt for it.
Observe your current IP and hit the connect button. Once connected your current IP will be changed and the extension icon on the Chrome bar turns green. Extensive information about your IP can be fetched by visiting TorGurd’s ‘What is my IP‘ page.
Do you know: TorGuard’s website detects your current IP and ISP details and displays it to you in websites header menu bar! Go check yourself.
TorGuard has a massive network across the globe for serving you. Around 3000+servers in 50+ countries serving different VPN services to TorGuard customers. You can figure out how much extensive mesh of servers they have to back these numbers. The complete list of their infrastructure can be found here.
TorGuard VPN features
Simply changing IP does not help to keep you anonymous online. So TorGuard has tonnes of features and add-ons to choose from. TorGuard offers simultaneous connections, unlimited speed & bandwidth, cross-platform compatibility. With security norms, it has OpenVPN/PPTP/L2TP/iKEv2/SSTP, Multiple Ciphers AES128/AES256, Stealth Proxy (ShadowProxy) to offer. Advertisers always find a way to sneak into your traffic and get the data for their partners. TorGuard has very strong ad network blocking along with malware blocking. It also blocks WebRTC/DNS/IPv6 Leaks.
TorGuard has anonymous webmail service as well. G/PGP end-to-end encrypted webmail for secured communication. It comes with MITM Protection which guard email against Man in the Middle Attacks. TorGuard offers higher-speed networks, dedicated IPs, residential IPs of specific countries as add-ons to its existing customers.
Plans and pricing
A basic anonymous VPN comes with $9.99 monthly. It’s best if you are just starting off with a VPN and wanted to try out before you invest a bigger amount in it. For an average user, their quarterly bundle pack is super. It’s for $19.99 and includes most of the features. All anonymous VPN plans can be seen here.
We have special 50% discounts for KernelTalks readers for Anonymous Proxy, Anonymous VPN, Anonymous Webmail products. Visit TorGuard with this link and enter coupon code KRNTLKS
We mentioned above about anonymous webmail service by TorGuard. It comes with free with VPN plans but only 10MB limited storage. For unlimited storage, you have to opt-in monthly, quarterly, or yearly plans which are for $6.95, $15.95 and $49.95. You can use coupons and links above to get heavy discounts!
Closing note
TorGuard VPN is the security niche essential tool for internet savvy people caring about their privacy and personal space. It offers basic services at a very low price and can be of great use with add-ons at the stack of some extra bucks.
Complete Spyrus WorkSafe Linux2Go drive review covering hardware and software features along with performance parameters.
Spyrus Linux2go device review by KernelTalks
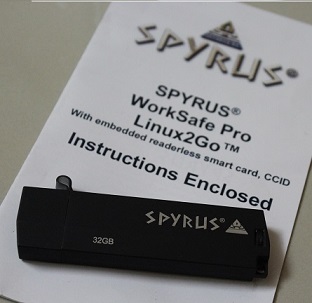
Spyrus WorkSafe Linux2Go is your personal Linux machine on a USB stick with military-grade security. Do you work in IT and move from office to office frequently? Do you travel a lot? Do you aim for lesser luggage to carry? You don’t want to carry the laptop everywhere you travel? then Spyrus WorkSafe is the solution for you. Its a secured USB device with SSD storage carrying complete OS and loaded with heavy security features. You just need a live computer with a keyboard, mouse, and USB port to tuck in. Plugin your Spyrus device, boot from USB with Spyrus, and you are good to go. Your workplace, your personal computer is with you all the time! And it’s super packed with hardware and software layer of securities that you should not be worried about someone trying to tamper it.
Let’s get more familiar with this device and get into its specification.
Physical dimensions
It’s a rock-solid device with a black metal casing. The casing is inside filled with an epoxy filling which saves the device from physical shocks and tampering attempts.
Linux2Go drive casing
The metal cap is designed large enough to cover the port physically well. It even clicks fit when closed so that it won’t loose open while you store the device in a bag, drawers, etc. Ensuring the device is well protected from dirt, moisture, physical damage, etc when not in use and sitting idle. The metal cap is secured with a soft rubber tether so that you won’t lose it when not closed. With the cap perfectly closed in, the device can withstand 1 meter of water depth for several minutes without any impact. Such kind of physical security is provided to the device which leaves a very rare chance of physical damage to the device.
The device measures 86.1 mm x 24.2 mm x 10.8 mm. It’s pretty large enough than normal USB storage sticks. With all this thickness, it’s not possible to connect any other USB device in a neighboring port. You may want to use a USB extension cable to access neighboring USB port. The casing does have a strap hole to attach keychain or sort of accessories.
Along with physical military-grade security, the device has so much to offer on software security front as well.
Spyrus linux2go drive
Device booting is protected by ToughBoot bootloader which is password protected. Only if you have ToughBoot password, you can boot device. When not booted into and plugged into to already running machine, you can use it as a smart card logon. The device is also loaded with CCID (Chip Card Interface Device) support and embedded readerless smart card for authentication. This smart card authentication can be used for secured network accesses or with PKI digital certificate functions.
The device is installed with BitLocker which offers full disk encryption for an extra layer of security. You can even create a separate encrypted partition with it. The device also offers military-grade XTS-AES 256 hardware-based encryption which is purely happening on the device only. Resources needed for hardware-based encryption are equipped with the device and it doesn’t rely on the host machine’s resources for encryption.
Spyrus offers central management of devices through SEMS (Spyrus Enterprise Management System) It helps to manage your devices centrally through one console. You can even get the help of it when you forgot your device passwords. It can also enable or disable drives remotely so you have full control of the device whether you have it physically with you or not.
Spyrus Linux2Go device is also configured with hardware read-only mode which can be added security for very sensitive data placed on it. More of such a technical feature list can be found here on their webpage.
Performance
The device is pretty quick to boot. It comes up to the ToughBoot password prompt within few seconds. My Spyrus WorkSafe Linux2Go drive booted in 17 seconds. Read-write speeds seem promising. Spyrus claimed sequential read up to 249 MB/sec and sequential write up to 238 MB/sec.
The device does get warm after long use. Performance is super on USB 3.0 ports and yes they are backward compatible with USB 2.0 ports as well. But you won’t get that optimum performance on 2.0 ports. Spyrus guarantees data retention on the drive for 10 years which is pretty good enough.
Spyrus WorkSafe Linux2Go drive datasheet here for your reference. Some more numbers, performance parameters are in this datasheet.
Where to buy
Spyrus Linux2Go drives are available in 32GB, 64GB, 128GB, 256GB, 512GB & 1TB sizing. As of today (at the time of writing this review) drives are not available to buy online directly. You need to contact Spyrus for your purchase. Spyrus does have the online store here but Linux2Go drives are not on sale there. Pricing details are not available online from Spyrus but approximately it varies from $2.5 to $4 per GB. Higher size device will have a lower price per GB and vice versa.
So why wait…Go get your copy of Linux2Go drive and carry your Linux world with you wherever you go!
We have a 10GB EBS volume attached to the Linux EC2 server. /testmount of 9.9GB is created using this disk at OS level. We will be increasing it to 15GB.
root@kerneltalks # lsblk
NAME                   MAJ:MIN RM  SIZE RO TYPE MOUNTPOINT
xvda                   202:0    0   10G  0 disk
└─xvda1                202:1    0   10G  0 part /
xvdf                   202:80   0   10G  0 disk
└─datavg-datalv (dm-0) 253:0    0  9.9G  0 lvm  /testmount
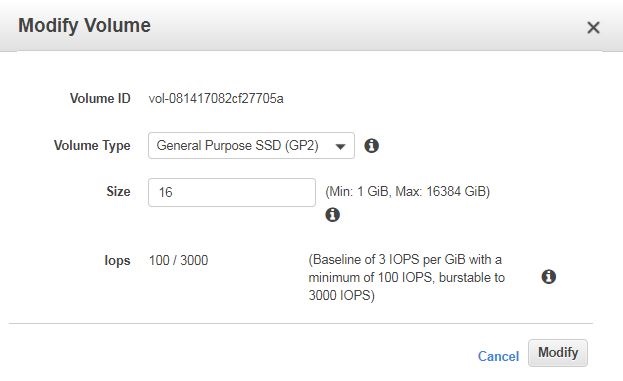
Step 1: How to extend EBS volume attached to the EC2 server in AWS
Login to AWS EC2 console, click on Volumes under Elastic Block Store in the left-hand side menu. Then select the volume you want to extend. From Actions drop-down menu select Modify Volume You will see below screen :
Modify EBS volume in AWS
Change size (in our case we changed from 10 to 16GB) and click Modify. Accept the confirmation dialogue box by clicking Yes.
Once modify operation succeeded, refresh the Volume list page and confirm the new size is being shown against the volume you modified just now. Now, your EBS volume is extended successfully at the AWS level. You need to extend it at OS level now.
Step 2: How to re-scan new size of EBS volume in Linux & extend filesystem online
Since EBS volumes size has been changed you need to rescan it in OS so that kernel and volume managers (LVM in our case) should make a note about the new size. In LVM, you can use pvresize command to rescan this extended EBS volume.
After successful rescan, check if the new size is identified by the kernel or not using lsblk command.
root@kerneltalks # lsblk
NAME                   MAJ:MIN RM  SIZE RO TYPE MOUNTPOINT
xvda                   202:0    0   10G  0 disk
└─xvda1                202:1    0   10G  0 part /
xvdf                   202:80   0   16G  0 disk
└─datavg-datalv (dm-0) 253:0    0  9.9G  0 lvm  /testmount
You can see in the above output, now xvdf disk is shown with size 16G! So, the new disk size is identified. Now proceed to extend file system online using lvextend and resize2fs. Read how to extend the filesystem online for more details.
root@kerneltalks # lvextend -L 15G /dev/datavg/datalv
  Extending logical volume datalv to 15.00 GiB
  Logical volume datalv successfully resized

root@kerneltalks # resize2fs /dev/datavg/datalv
resize2fs 1.41.12 (17-May-2010)
Filesystem at /dev/datavg/datalv is mounted on /testmount; on-line resizing required
old desc_blocks = 1, new_desc_blocks = 1
Performing an on-line resize of /dev/datavg/datalv to 3932160 (4k) blocks.
The filesystem on /dev/datavg/datalv is now 3932160 blocks long.
Check if the mount point is showing new bigger size.
root@kerneltalks # df -Ph /testmount
Filesystem                 Size  Used Avail Use% Mounted on
/dev/mapper/datavg-datalv   15G  153M   14G   2% /testmount
Yup, as we planned /testmount is now 15G in size from 9.9GB earlier size.
Learn the zypper command with 12 useful examples along with sample outputs. zypper is used for package and patch management in Suse Linux systems.
zypper command examples
zypper is a package management system powered by ZYpp package manager engine. Suse Linux uses zypper for package management. In this article, we will be sharing 12 useful zypper commands along with examples that are helpful for your day to day sysadmin tasks.
Without any argument zypper command will list you all available switches which can be used. It’s quite handy than referring to the man page which is pretty much in detail.
root@kerneltalks # zypper
  Usage:
        zypper [--global-options] <command> [--command-options] [arguments]
        zypper <subcommand> [--command-options] [arguments]

  Global Options:
        --help, -h              Help.
        --version, -V           Output the version number.
        --promptids             Output a list of zypper's user prompts.
        --config, -c <file>     Use specified config file instead of the default                                                                                        .
        --userdata <string>     User defined transaction id used in history and                                                                                         plugins.
        --quiet, -q             Suppress normal output, print only error
                                messages.
        --verbose, -v           Increase verbosity.
        --color
        --no-color              Whether to use colors in output if tty supports                                                                                         it.
        --no-abbrev, -A         Do not abbreviate text in tables.
        --table-style, -s       Table style (integer).
        --non-interactive, -n   Do not ask anything, use default answers
                                automatically.
        --non-interactive-include-reboot-patches
                                Do not treat patches as interactive, which have
                                the rebootSuggested-flag set.
        --xmlout, -x            Switch to XML output.
        --ignore-unknown, -i    Ignore unknown packages.

        --reposd-dir, -D <dir>  Use alternative repository definition file
                                directory.
        --cache-dir, -C <dir>   Use alternative directory for all caches.
        --raw-cache-dir <dir>   Use alternative raw meta-data cache directory.
        --solv-cache-dir <dir>  Use alternative solv file cache directory.
        --pkg-cache-dir <dir>   Use alternative package cache directory.

     Repository Options:
        --no-gpg-checks         Ignore GPG check failures and continue.
        --gpg-auto-import-keys  Automatically trust and import new repository
                                signing keys.
        --plus-repo, -p <URI>   Use an additional repository.
        --plus-content <tag>    Additionally use disabled repositories providing                                                                                         a specific keyword.
                                Try '--plus-content debug' to enable repos indic                                                                                        ating to provide debug packages.
        --disable-repositories  Do not read meta-data from repositories.
        --no-refresh            Do not refresh the repositories.
        --no-cd                 Ignore CD/DVD repositories.
        --no-remote             Ignore remote repositories.
        --releasever            Set the value of $releasever in all .repo files                                                                                         (default: distribution version)

     Target Options:
        --root, -R <dir>        Operate on a different root directory.
        --disable-system-resolvables
                                Do not read installed packages.

  Commands:
        help, ?                 Print help.
        shell, sh               Accept multiple commands at once.

     Repository Management:
        repos, lr               List all defined repositories.
        addrepo, ar             Add a new repository.
        removerepo, rr          Remove specified repository.
        renamerepo, nr          Rename specified repository.
        modifyrepo, mr          Modify specified repository.
        refresh, ref            Refresh all repositories.
        clean                   Clean local caches.

     Service Management:
        services, ls            List all defined services.
        addservice, as          Add a new service.
        modifyservice, ms       Modify specified service.
        removeservice, rs       Remove specified service.
        refresh-services, refs  Refresh all services.

     Software Management:
        install, in             Install packages.
        remove, rm              Remove packages.
        verify, ve              Verify integrity of package dependencies.
        source-install, si      Install source packages and their build
                                dependencies.
        install-new-recommends, inr
                                Install newly added packages recommended
                                by installed packages.

     Update Management:
        update, up              Update installed packages with newer versions.
        list-updates, lu        List available updates.
        patch                   Install needed patches.
        list-patches, lp        List needed patches.
        dist-upgrade, dup       Perform a distribution upgrade.
        patch-check, pchk       Check for patches.

     Querying:
        search, se              Search for packages matching a pattern.
        info, if                Show full information for specified packages.
        patch-info              Show full information for specified patches.
        pattern-info            Show full information for specified patterns.
        product-info            Show full information for specified products.
        patches, pch            List all available patches.
        packages, pa            List all available packages.
        patterns, pt            List all available patterns.
        products, pd            List all available products.
        what-provides, wp       List packages providing specified capability.

     Package Locks:
        addlock, al             Add a package lock.
        removelock, rl          Remove a package lock.
        locks, ll               List current package locks.
        cleanlocks, cl          Remove unused locks.

     Other Commands:
        versioncmp, vcmp        Compare two version strings.
        targetos, tos           Print the target operating system ID string.
        licenses                Print report about licenses and EULAs of
                                installed packages.
        download                Download rpms specified on the commandline to a                                                                                         local directory.
        source-download         Download source rpms for all installed packages
                                to a local directory.

     Subcommands:
        subcommand              Lists available subcommands.

Type 'zypper help <command>' to get command-specific help.
How to install the package using zypper
zypper takes in or install switch to install the package on your system. It’s the same as yum package installation, supplying package name as an argument, and package manager (zypper here) will resolve all dependencies and install them along with your required package.
# zypper install telnet
Refreshing service 'SMT-http_smt-ec2_susecloud_net'.
Refreshing service 'cloud_update'.
Loading repository data...
Reading installed packages...
Resolving package dependencies...

The following NEW package is going to be installed:
  telnet

1 new package to install.
Overall download size: 51.8 KiB. Already cached: 0 B. After the operation, additional 113.3 KiB will be used.
Continue? [y/n/...? shows all options] (y): y
Retrieving package telnet-1.2-165.63.x86_64                                                                                        (1/1),  51.8 KiB (113.3 KiB unpacked)
Retrieving: telnet-1.2-165.63.x86_64.rpm .........................................................................................................................[done]
Checking for file conflicts: .....................................................................................................................................[done]
(1/1) Installing: telnet-1.2-165.63.x86_64 .......................................................................................................................[done]
Above output for your reference in which we installed telnet package.
For erasing or removing packages in Suse Linux, use zypper with remove or rm switch.
root@kerneltalks # zypper rm telnet
Loading repository data...
Reading installed packages...
Resolving package dependencies...

The following package is going to be REMOVED:
  telnet

1 package to remove.
After the operation, 113.3 KiB will be freed.
Continue? [y/n/...? shows all options] (y): y
(1/1) Removing telnet-1.2-165.63.x86_64 ..........................................................................................................................[done]
We removed previously installed telnet package here.
Check dependencies and verify the integrity of installed packages using zypper
There are times when one can install the package by force ignoring dependencies. zypper gives you the power to scan all installed packages and checks for their dependencies too. If any dependency is missing, it offers you to install/remove it and hence maintain the integrity of your installed packages.
Use verify or ve switch with zypper to check the integrity of installed packages.
root@kerneltalks # zypper ve
Refreshing service 'SMT-http_smt-ec2_susecloud_net'.
Refreshing service 'cloud_update'.
Loading repository data...
Reading installed packages...

Dependencies of all installed packages are satisfied.
In the above output, you can see the last line confirms that all dependencies of installed packages are completed and no action required.
How to download package using zypper in Suse Linux
zypper offers a way to download the package in the local directory without installation. You can use this downloaded package on another system with the same configuration. Packages will be downloaded to /var/cache/zypp/packages/<repo>/<arch>/ directory.
root@kerneltalks # zypper download telnet
Refreshing service 'SMT-http_smt-ec2_susecloud_net'.
Refreshing service 'cloud_update'.
Loading repository data...
Reading installed packages...
Retrieving package telnet-1.2-165.63.x86_64                                                                                        (1/1),  51.8 KiB (113.3 KiB unpacked)
(1/1) /var/cache/zypp/packages/SMT-http_smt-ec2_susecloud_net:SLES12-SP3-Pool/x86_64/telnet-1.2-165.63.x86_64.rpm ................................................[done]

download: Done.

# ls -lrt /var/cache/zypp/packages/SMT-http_smt-ec2_susecloud_net:SLES12-SP3-Pool/x86_64/
total 52
-rw-r--r-- 1 root root 53025 Feb 21 03:17 telnet-1.2-165.63.x86_64.rpm
You can see we have downloaded telnet package locally using zypper
zypper allows you to view all available updates for your installed packages so that you can plan update activity in advance. Use list-updates or lu switch to show you a list of all available updates for installed packages.
root@kerneltalks # zypper lu
Refreshing service 'SMT-http_smt-ec2_susecloud_net'.
Refreshing service 'cloud_update'.
Loading repository data...
Reading installed packages...
S | Repository                        | Name                       | Current Version               | Available Version                  | Arch
--+-----------------------------------+----------------------------+-------------------------------+------------------------------------+-------
v | SLES12-SP3-Updates                | at-spi2-core               | 2.20.2-12.3                   | 2.20.2-14.3.1                      | x86_64
v | SLES12-SP3-Updates                | bash                       | 4.3-82.1                      | 4.3-83.5.2                         | x86_64
v | SLES12-SP3-Updates                | ca-certificates-mozilla    | 2.7-11.1                      | 2.22-12.3.1                        | noarch
v | SLE-Module-Containers12-Updates   | containerd                 | 0.2.5+gitr639_422e31c-20.2    | 0.2.9+gitr706_06b9cb351610-16.8.1  | x86_64
v | SLES12-SP3-Updates                | crash                      | 7.1.8-4.3.1                   | 7.1.8-4.6.2                        | x86_64
v | SLES12-SP3-Updates                | rsync                      | 3.1.0-12.1                    | 3.1.0-13.10.1                      | x86_64
The output is properly formatted for easy reading. Column wise it shows the name of repo where package belongs, package name, installed version, new updated available version & architecture.
List and install patches in Suse linux
Use list-patches or lp switch to display all available patches for your Suse Linux system which needs to be applied.
The output is pretty much nicely organized with respective headers. You can easily figure out and plan your patch update accordingly. We can see out of 37 patches available on our system 18 are security ones and needs to be applied on high priority!
You can install all needed patches by issuing zypper patch command.
How to update package using zypper
To update package using zypper, use update or up switch followed by package name. In the above list updates command, we learned that rsync package update is available on our server. Let update it now –
root@kerneltalks # zypper update rsync
Refreshing service 'SMT-http_smt-ec2_susecloud_net'.
Refreshing service 'cloud_update'.
Loading repository data...
Reading installed packages...
Resolving package dependencies...

The following package is going to be upgraded:
  rsync

1 package to upgrade.
Overall download size: 325.2 KiB. Already cached: 0 B. After the operation, additional 64.0 B will be used.
Continue? [y/n/...? shows all options] (y): y
Retrieving package rsync-3.1.0-13.10.1.x86_64                                                                                      (1/1), 325.2 KiB (625.5 KiB unpacked)
Retrieving: rsync-3.1.0-13.10.1.x86_64.rpm .......................................................................................................................[done]
Checking for file conflicts: .....................................................................................................................................[done]
(1/1) Installing: rsync-3.1.0-13.10.1.x86_64 .....................................................................................................................[done]
Search package using zypper in Suse Linux
If you are not sure about the full package name, no worries. You can search packages in zypper by supplying search string with se or search switch
root@kerneltalks # zypper se lvm
Refreshing service 'SMT-http_smt-ec2_susecloud_net'.
Refreshing service 'cloud_update'.
Loading repository data...
Reading installed packages...

S  | Name          | Summary                      | Type
---+---------------+------------------------------+-----------
   | libLLVM       | Libraries for LLVM           | package
   | libLLVM-32bit | Libraries for LLVM           | package
   | llvm          | Low Level Virtual Machine    | package
   | llvm-devel    | Header Files for LLVM        | package
   | lvm2          | Logical Volume Manager Tools | srcpackage
i+ | lvm2          | Logical Volume Manager Tools | package
   | lvm2-devel    | Development files for LVM2   | package
In the above example, we searched lvm string and came up with the list shown above. You can use Name in zypper install/remove/update commands.
Check installed package information using zypper
You can check installed packages details using zypper. info or if switch will list out information of the installed package. It can also display package details which are not installed. In that case, Installed parameter will reflect No value.
root@kerneltalks # zypper info rsync
Refreshing service 'SMT-http_smt-ec2_susecloud_net'.
Refreshing service 'cloud_update'.
Loading repository data...
Reading installed packages...


Information for package rsync:
------------------------------
Repository     : SLES12-SP3-Updates
Name           : rsync
Version        : 3.1.0-13.10.1
Arch           : x86_64
Vendor         : SUSE LLC <https://www.suse.com/>
Support Level  : Level 3
Installed Size : 625.5 KiB
Installed      : Yes
Status         : up-to-date
Source package : rsync-3.1.0-13.10.1.src
Summary        : Versatile tool for fast incremental file transfer
Description    :
    Rsync is a fast and extraordinarily versatile file  copying  tool. It can copy
    locally, to/from another host over any remote shell, or to/from a remote rsync
    daemon. It offers a large number of options that control every aspect of its
    behavior and permit very flexible specification of the set of files to be
    copied. It is famous for its delta-transfer algorithm, which reduces the amount
    of data sent over the network by sending only the differences between the
    source files and the existing files in the destination. Rsync is widely used
    for backups and mirroring and as an improved copy command for everyday use.
List repositories using zypper
To list repo use lr or repos switch with zypper command. It will list all available repos which include enabled and not-enabled both repos.
root@kerneltalks # zypper lr
Refreshing service 'cloud_update'.
Repository priorities are without effect. All enabled repositories share the same priority.

#  | Alias                                                                                | Name                                                  | Enabled | GPG Check | Refresh
---+--------------------------------------------------------------------------------------+-------------------------------------------------------+---------+-----------+--------
 1 | SMT-http_smt-ec2_susecloud_net:SLE-Module-Adv-Systems-Management12-Debuginfo-Pool    | SLE-Module-Adv-Systems-Management12-Debuginfo-Pool    | No      | ----      | ----
 2 | SMT-http_smt-ec2_susecloud_net:SLE-Module-Adv-Systems-Management12-Debuginfo-Updates | SLE-Module-Adv-Systems-Management12-Debuginfo-Updates | No      | ----      | ----
 3 | SMT-http_smt-ec2_susecloud_net:SLE-Module-Adv-Systems-Management12-Pool              | SLE-Module-Adv-Systems-Management12-Pool              | Yes     | (r ) Yes  | No
 4 | SMT-http_smt-ec2_susecloud_net:SLE-Module-Adv-Systems-Management12-Updates           | SLE-Module-Adv-Systems-Management12-Updates           | Yes     | (r ) Yes  | Yes
 5 | SMT-http_smt-ec2_susecloud_net:SLE-Module-Containers12-Debuginfo-Pool                | SLE-Module-Containers12-Debuginfo-Pool                | No      | ----      | ----
 6 | SMT-http_smt-ec2_susecloud_net:SLE-Module-Containers12-Debuginfo-Updates             | SLE-Module-Containers12-Debuginfo-Updates             | No      | ----      | ----
here you need to check enabled column to check which repos are enabled and which are not.
Learn how to enable repository using subscription-manager in RHEL. The article also includes steps to register system with Red Hat, attach subscription and errors along with resolutions.
Enable repository using subscription-manager
In this article, we will walk you through step by step process to enable Red Hat repository in RHEL fresh installed server.
The repository can be enabled using subscription-managercommand like below –
root@kerneltalks # subscription-manager repos --enable rhel-6-server-rhv-4-agent-beta-debug-rpms
Error: 'rhel-6-server-rhv-4-agent-beta-debug-rpms' does not match a valid repository ID. Use "subscription-manager repos --list" to see valid repositories.
You will see the above error when your subscription is not in place. Let’s go through step by step procedure to enable repositories via subscription-manager
Step 1 : Register your system with Red Hat
We are considering you have a freshly installed system and it’s not yet registered with Red Hat. If you have a registered system already then you can ignore this step.
You can check if your system is registered with Red Hat for the subscription using below command –
# subscription-manager version
server type: This system is currently not registered.
subscription management server: Unknown
subscription management rules: Unknown
subscription-manager: 1.18.10-1.el6
python-rhsm: 1.18.6-1.el6
Here, in the first line of output, you can see the system is not registered. So, let’s start with the registering system. You need to use the subscription-managercommand with register switch. You need to use your Red Hat account credentials here.
root@kerneltalks # subscription-manager register
Registering to: subscription.rhsm.redhat.com:443/subscription
Username: admin@kerneltalks.com
Password:
Network error, unable to connect to server. Please see /var/log/rhsm/rhsm.log for more information.
If you are getting above error then your server is not able to reach RedHat. Check internet connection & if you are able to resolve site names. Sometimes even if you are able to ping the subscription server, you will see this error. This might be because you have the proxy server in your environment. In such a case, you need to add its details in file /etc/rhsm/rhsm.conf. Below proxy details should be populated :
# an http proxy server to use
 proxy_hostname =

# port for http proxy server
 proxy_port =

# user name for authenticating to an http proxy, if needed
 proxy_user =

# password for basic http proxy auth, if needed
 proxy_password =
Once you are done, recheck if subscription-manager taken up new proxy details by using below command –
root@kerneltalks # subscription-manager register
Registering to: subscription.rhsm.redhat.com:443/subscription
Username: admin@kerneltalks.com
Password:
You must first accept Red Hat's Terms and conditions. Please visit https://www.redhat.com/wapps/tnc/termsack?event[]=signIn . You may have to log out of and back into the Customer Portal in order to see the terms.
You will see the above error if you are adding the server to your Red Hat account for the first time. Go to the URL and accept the terms. Come back to the terminal and try again.
root@kerneltalks # subscription-manager register
Registering to: subscription.rhsm.redhat.com:443/subscription
Username: admin@kerneltalks.com
Password:
The system has been registered with ID: xxxxb2-xxxx-xxxx-xxxx-xx8e199xxx
Bingo! The system is registered with Red Hat now. You can again verify it with version switch.
root@kerneltalks # subscription-manager version
server type: Red Hat Subscription Management
subscription management server: 2.0.43-1
subscription management rules: 5.26
subscription-manager: 1.18.10-1.el6
python-rhsm: 1.18.6-1.el6
Step 2: Attach subscription to your server
First, try to list repositories. You won’t be able to list any since we haven’t attached any subscription to our server yet.
root@kerneltalks # subscription-manager repos --list
This system has no repositories available through subscriptions.
As you can see subscription-manager couldn’t found any repositories, you need to attach subscriptions to your server. Once the subscription is attached, subscription-manager will be able to list repositories under it.
To attach subscription, check all available subscriptions for your server with below command –
root@kerneltalks # subscription-manager list --available
+-------------------------------------------+
Available Subscriptions
+-------------------------------------------+
Subscription Name: Red Hat Enterprise Linux for Virtual Datacenters, Standard
Provides: Red Hat Beta
Red Hat Software Collections (for RHEL Server)
Red Hat Enterprise Linux Atomic Host Beta
Oracle Java (for RHEL Server)
Red Hat Enterprise Linux Server
dotNET on RHEL (for RHEL Server)
Red Hat Enterprise Linux Atomic Host
Red Hat Software Collections Beta (for RHEL Server)
Red Hat Developer Tools Beta (for RHEL Server)
Red Hat Developer Toolset (for RHEL Server)
Red Hat Developer Tools (for RHEL Server)
SKU: RH00050
Contract: xxxxxxxx
Pool ID: 8a85f98c6011059f0160110a2ae6000f
Provides Management: Yes
Available: Unlimited
Suggested: 0
Service Level: Standard
Service Type: L1-L3
Subscription Type: Stackable (Temporary)
Ends: 12/01/2018
System Type: Virtual
You will get the list of such subscriptions available for your server. You need to read through what it provides and note down Pool ID of subscriptions that are useful/required for you.
Now, attach subscriptions to your server by using pool ID.
root@kerneltalks # subscription-manager attach --pool=8a85f98c6011059f0160110a2ae6000f
Successfully attached a subscription for: Red Hat Enterprise Linux for Virtual Datacenters, Standard
If you are not sure which one to pick, you can simply attach subscriptions automatically which are best suited for your server with below command –
root@kerneltalks # subscription-manager attach --auto
Installed Product Current Status:
Product Name: Red Hat Enterprise Linux Server
Status: Subscribed
Move on to the final step to enable repository.
Step 3: Enable repository
Now you will enable repository which is available under your attached subscription.
root@kerneltalks # subscription-manager repos --enable rhel-6-server-rhv-4-agent-beta-debug-rpms
Repository 'rhel-6-server-rhv-4-agent-beta-debug-rpms' is enabled for this system.