Learn how to assign elastic IP to the ec2 Linux instance in AWS. Step by step procedure explaining how to allocate elastic IP to your account and how to associate it to EC2.

In this article we will walk through steps to assign elastic IP on Linux EC2 instance. First of all you might think what is elastic IP and why to use it? We have already covered here elastic IP basics and the difference between elastic and public IP. Without further delay lets move onto our tutorial of assigning elastic IP to EC2 instance.
Get ready your EC2 for Elastic IP
First of all you should have launched your EC2 instance. It should be in a running state. Once running you can check instance properties in EC2 console under AWS dashboard and its IP details should be as below :
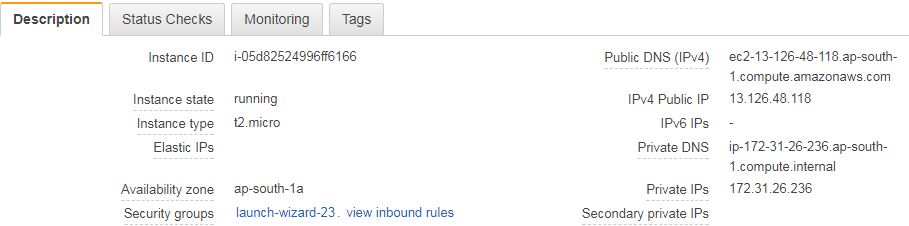
Here you can see the Elastic IP field is empty and the Public IP field is populated with AWS auto-assigned IP address.
Remember, only one of these two exist for EC2 instance; either public or elastic IP.
Allocate Elastic IP to AWS account
The second step is to allocate your AWS account new Elastic IP if you haven’t allocated any elastic IP before.
Note that only 5 elastic IP can be allocated to a single AWS account and you will be charged for any elastic IP which is not being used.
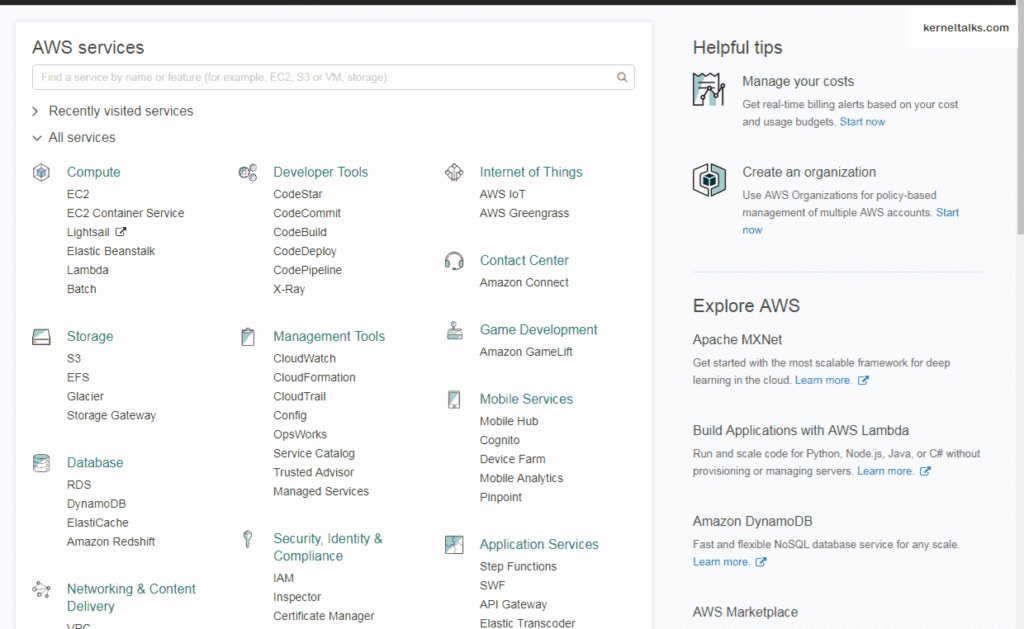
Let’s see how to allocate an elastic IP to the AWS account. Navigate to VPC under your AWS dashboard. You will be presented with the VPC console where on the left pane you can find the ‘Elastic IPs‘ menu. Click on that to open the Elastic IP dashboard. Here you see the ‘Allocate New Address‘ button. On the next screen click ‘Allocate‘ and you will be allocated with new Elastic IP in your account. I created GIF (below) of the whole process for your reference.
Associate Elastic IP to EC2 instance
Now you have one elastic IP allocated to your account. You need to associate this IP to EC2 instance. Again head back to Elastic IP dashboard where you will see your newly allocated elastic IP. Select it and choose ‘associate address‘ from the action menu. You will see pop up like below :

Select the resource type as an instance. Select your EC2 Instance from the dropdown. Private IP{ is elastic IP which you are associating now (pre-populated).
Here you can see a warning if you associate elastic IP with instance your public IP will be released. This is what we mentioned in the first part of this tutorial that only one IP can exist.
Once associated you can check IP details as below :
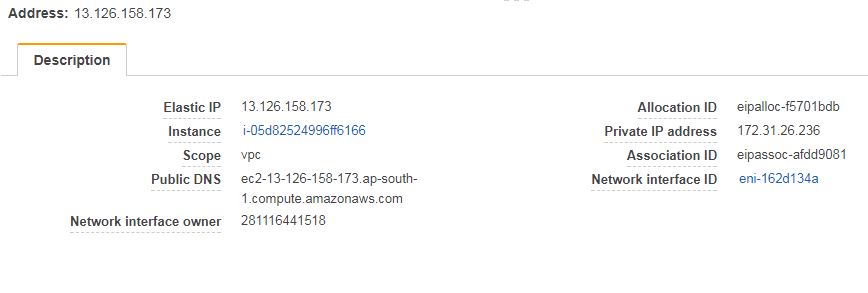
where you can confirm that it is associated with EC2 instance by verifying ‘Instance‘ field value.
Verify Elastic IP on EC2 instance
You are done! You already associated your elastic IP to EC2 instance. Now you can verify it with all the below methods :
- Connect using elastic IP via putty. You should be connected (provided security groups are configured properly)
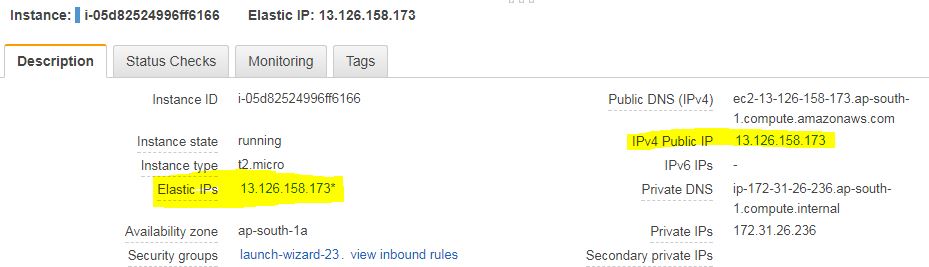
- Go to the EC2 console and check the instance details. You will see the Elastic IP field is populated and Public IP field reflects elastic IP as below :
Login to your EC2 instance and run below commands which gives elastic IP as output. Make sure you have curl, wget utilities installed. If not, install them using YUM or APT.
root@kerneltalks # curl checkip.amazonaws.com
13.126.158.173

root@kerneltalks # wget -qO- http://instance-data/latest/meta-data/public-ipv4
13.126.158.173
In our next article we have discussed how to dis-associate and release elastic IP also elastic IP billing.
hai , i have 1 requirement ,we want to maintain Static IP to Autoscaling group when an instance goes shut down.
without load balancer we have to implement it.
how is it possible can you share some script for that if possible?