Short article to demonstrate how to upgrade SUSE 12 SP1 to SP3 and SP4

First, you need to install zypper-migration-plugin . This plugin helps you in the migration from a lower service pack to the higher service pack.
kerneltalks:~ # zypper in zypper-migration-plugin
Refreshing service 'SMT-http_smt-ec2_susecloud_net'.
Refreshing service 'cloud_update'.
Loading repository data...
Reading installed packages...
Resolving package dependencies...

The following NEW package is going to be installed:
  zypper-migration-plugin

1 new package to install.
Overall download size: 10.5 KiB. Already cached: 0 B. After the operation, additional 16.7 KiB will be used.
Continue? [y/n/? shows all options] (y): y
Retrieving package zypper-migration-plugin-0.10-9.1.noarch                                                                         (1/1),  10.5 KiB ( 16.7 KiB unpacked)
Retrieving: zypper-migration-plugin-0.10-9.1.noarch.rpm ..........................................................................................................[done]
Checking for file conflicts: .....................................................................................................................................[done]
(1/1) Installing: zypper-migration-plugin-0.10-9.1.noarch ........................................................................................................[done]
Then make sure your system is patched to the current patch level. You can use the below command to install all the latest patches.
kerneltalks:~ # zypper patch
Now, once you are ready with the backup of the current system, proceed to migrate from SP1 to SP2. Use command zypper migration and you can see a list of service pack upgrades for your system. Although, we see that we can skip SP and upgrade to higher service packs, its
kerneltalks:~ # zypper migration
Executing 'zypper refresh'
Refreshing service 'cloud_update'.
........
All repositories have been refreshed.
Executing 'zypper --no-refresh patch-check --updatestack-only'
Loading repository data...
Reading installed packages...
0 patches needed (0 security patches)
Unavailable migrations (product is not mirrored):
SUSE Linux Enterprise High Performance Computing 12 SP3 x86_64 (not available)
SUSE Linux Enterprise Software Development Kit 12 SP3 x86_64
Advanced Systems Management Module 12 x86_64 (already installed)
Containers Module 12 x86_64 (already installed)
Public Cloud Module 12 x86_64 (already installed)
Legacy Module 12 x86_64 (already installed)
Web and Scripting Module 12 x86_64 (already installed)
Toolchain Module 12 x86_64 (already installed)
SUSE Linux Enterprise High Performance Computing 12 SP2 x86_64 (not available)
SUSE Linux Enterprise Software Development Kit 12 SP2 x86_64
Advanced Systems Management Module 12 x86_64 (already installed)
Containers Module 12 x86_64 (already installed)
Public Cloud Module 12 x86_64 (already installed)
Legacy Module 12 x86_64 (already installed)
Web and Scripting Module 12 x86_64 (already installed)
Toolchain Module 12 x86_64 (already installed)
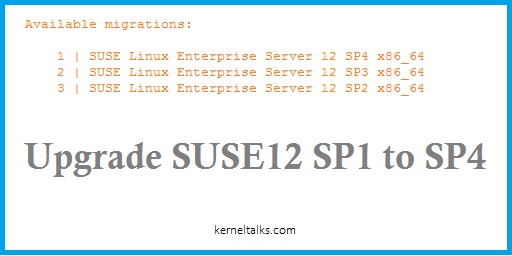
Available migrations:
1 | SUSE Linux Enterprise Server 12 SP4 x86_64
SUSE Linux Enterprise Software Development Kit 12 SP4 x86_64
Advanced Systems Management Module 12 x86_64 (already installed)
Containers Module 12 x86_64 (already installed)
Public Cloud Module 12 x86_64 (already installed)
Legacy Module 12 x86_64 (already installed)
Web and Scripting Module 12 x86_64 (already installed)
Toolchain Module 12 x86_64 (already installed)
2 | SUSE Linux Enterprise Server 12 SP3 x86_64
SUSE Linux Enterprise Software Development Kit 12 SP3 x86_64
Advanced Systems Management Module 12 x86_64 (already installed)
Containers Module 12 x86_64 (already installed)
Public Cloud Module 12 x86_64 (already installed)
Legacy Module 12 x86_64 (already installed)
Web and Scripting Module 12 x86_64 (already installed)
Toolchain Module 12 x86_64 (already installed)
3 | SUSE Linux Enterprise Server 12 SP2 x86_64
SUSE Linux Enterprise Software Development Kit 12 SP2 x86_64
Advanced Systems Management Module 12 x86_64 (already installed)
Containers Module 12 x86_64 (already installed)
Public Cloud Module 12 x86_64 (already installed)
Legacy Module 12 x86_64 (already installed)
Web and Scripting Module 12 x86_64 (already installed)
Toolchain Module 12 x86_64 (already installed)
[num/q]:
You can see the migration plugin gave us the choice to jump from SP1 to SP2 or SP3 or SP4. Enter numeric against your choice and then it will upgrade related packages on your system. Here we select to go from SP1 to SP2 by tying 3.
[num/q]: 3

Executing 'snapper create --type pre --cleanup-algorithm=number --print-number --userdata important=yes --description 'before online migration''

sh: snapper: command not found
Upgrading product SUSE Linux Enterprise Server 12 SP2 x86_64.
Upgrading product SUSE Linux Enterprise Software Development Kit 12 SP2 x86_64.
Upgrading product Advanced Systems Management Module 12 x86_64.
Upgrading product Containers Module 12 x86_64.
Upgrading product Public Cloud Module 12 x86_64.
Upgrading product Legacy Module 12 x86_64.
Upgrading product Web and Scripting Module 12 x86_64.
Upgrading product Toolchain Module 12 x86_64.

Executing 'zypper --releasever 12.2 ref -f'
...................................
Once completed reboot system. Check OS version and you can see we are upgraded from SP1 to SP2
kerneltalks:~ # cat /etc/os-release
NAME="SLES"
VERSION="12-SP2"
VERSION_ID="12.2"
PRETTY_NAME="SUSE Linux Enterprise Server 12 SP2"
ID="sles"
ANSI_COLOR="0;32"
CPE_NAME="cpe:/o:suse:sles:12:sp2"
Now, repeat process to upgrade OS from SP2 to SP3 and SP4.