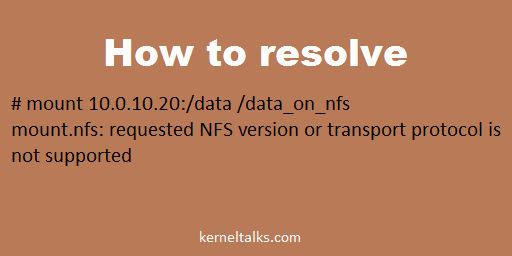
Troubleshooting error ‘mount.nfs: requested NFS version or transport protocol is not supported’ and how to resolve it.
Resolve NFS error
Another troubleshooting article aimed at specific errors and help you how to solve it. In this article, we will see how to resolve error ‘mount.nfs: requested NFS version or transport protocol is not supported’ seen on NFS client while trying to mount NFS share.
# mount 10.0.10.20:/data /data_on_nfs
mount.nfs: requested NFS version or transport protocol is not supported
Sometimes you see error mount.nfs: requested NFS version or transport protocol is not supported when you try to mount NFS share on NFS client. There are couple of reasons you see this error :
NFS services are not running on NFS server
NFS utils not installed on the client
NFS service hung on NFS server
NFS services at the NFS server can be down or hung due to multiple reasons like server utilization, server reboot, etc.
To get rid of this error and successfully mount your share follow the below steps.
Login to the NFS server and check the NFS services status.
[root@kerneltalks]# service nfs status
rpc.svcgssd is stopped
rpc.mountd is stopped
nfsd is stopped
rpc.rquotad is stopped
In the above output you can see the NFS services are stopped on the server. Start them.
[root@kerneltalks]# service nfs start
Starting NFS services: [ OK ]
Starting NFS quotas: [ OK ]
Starting NFS mountd: [ OK ]
Starting NFS daemon: [ OK ]
Starting RPC idmapd: [ OK ]
You might want to check for nfs-server or nfsserver service as well depends on your Linux distro.
Now try to mount NFS share on the client. And you will be able to mount them using the same command we see earlier!
Solution 2 :
If that doesn’t work for you then try installing package nfs-utils on your server and you will get through this error.
Solution 3 :
Open file /etc/sysconfig/nfs and try to check below parameters
# Turn off v4 protocol support
#RPCNFSDARGS="-N 4"
# Turn off v2 and v3 protocol support
#RPCNFSDARGS="-N 2 -N 3"
Removing hash from RPCNFSDARGS lines will turn off specific version support. This way clients with mentioned NFS versions won’t be able to connect to the NFS server for mounting share. If you have any of it enabled, try disabling it and mounting at the client after the NFS server service restarts.
Let us know if you have faced this error and solved it by any other methods in the comments below. We will update our article with your information to keep it updated and help the community live better!
Learn how to use speedtest CLI tool to test internet speed in the Linux terminal. It also includes a one-liner python command to get speed details right away.
Internet speed check in Linux
Most of us check the internet bandwidth speed whenever we connect to a new network or wifi. So why not our servers! Here is a tutorial that will walk you through to test internet speed in the Linux terminal.
Every one of us generally uses Speedtest by Ookla to check internet speed. It’s a pretty simple process for a desktop. Go to their website and just click the GO button. It will scan your location and speed test with the nearest server. If you are on mobile, they have their app for you. But if you are on the terminal with command-line interface things are little different. Let’s see how to check internet speed from the Linux terminal.
If you want to speed check only once and don’t want to download the tool on the server, jump here and see one-liner command.
Step 1 : Download speedtest cli tool
First of all, you have to download speedtest CLI tool from the GitHub repository. Nowadays, it also included in many well known Linux repositories as well. If it’s there then you can directly install that package on your Linux distro.
Let’s proceed with the Github download and install process. Install the git package depending on your distro. Then clone Github repo of speedtest like below:
It will be cloned to your present working directory. A new directory named speedtest-cli will be created. You can see the below files in it.
[root@kerneltalks ~]# cd speedtest-cli
[root@kerneltalks speedtest-cli]# ll
total 96
-rw-r--r--. 1 root root  1671 Oct  7 16:55 CONTRIBUTING.md
-rw-r--r--. 1 root root 11358 Oct  7 16:55 LICENSE
-rw-r--r--. 1 root root    35 Oct  7 16:55 MANIFEST.in
-rw-r--r--. 1 root root  5215 Oct  7 16:55 README.rst
-rw-r--r--. 1 root root    20 Oct  7 16:55 setup.cfg
-rw-r--r--. 1 root root  3196 Oct  7 16:55 setup.py
-rw-r--r--. 1 root root  2385 Oct  7 16:55 speedtest-cli.1
-rw-r--r--. 1 root root  1200 Oct  7 16:55 speedtest_cli.py
-rwxr-xr-x. 1 root root 47228 Oct  7 16:55 speedtest.py
-rw-r--r--. 1 root root   333 Oct  7 16:55 tox.ini
The python script speedtest.py is the one we will be using to check internet speed.
You can link this script for a command in /usr/bin so that all users on the server can use it. Or you can even create command alias for it and it will be easy for all users to use it.
Step 2 : Run python script
Now, run a python script without any argument and it will search the nearest server and test your internet speed.
[root@kerneltalks speedtest-cli]# python speedtest.py
Retrieving speedtest.net configuration...
Testing from Amazon (35.154.184.126)...
Retrieving speedtest.net server list...
Selecting best server based on ping...
Hosted by Spectra (Mumbai) [1.15 km]: 8.174 ms
Testing download speed................................................................................
Download: 548.13 Mbit/s
Testing upload speed................................................................................................
Upload: 323.95 Mbit/s
You can see here, the first column is a server identifier followed by the name of the company hosting that server, location, and finally its distance from your location.
To test the internet speed using specific server use --server switch and server identifier from the previous output as an argument.
[root@kerneltalks speedtest-cli]# python speedtest.py --server 2827
Retrieving speedtest.net configuration...
Testing from Amazon (35.154.184.126)...
Retrieving speedtest.net server list...
Selecting best server based on ping...
Hosted by Bharti Airtel Ltd (Mumbai) [1.15 km]: 13.234 ms
Testing download speed................................................................................
Download: 93.47 Mbit/s
Testing upload speed................................................................................................
Upload: 69.25 Mbit/s
To get the share link of your speed test, use –share switch. It will give you the URL of your test hosted on speedtest website. You can share this URL.
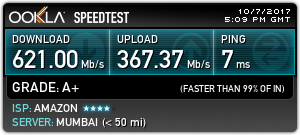
[root@kerneltalks speedtest-cli]# python speedtest.py --share
Retrieving speedtest.net configuration...
Testing from Amazon (35.154.184.126)...
Retrieving speedtest.net server list...
Selecting best server based on ping...
Hosted by Spectra (Mumbai) [1.15 km]: 7.471 ms
Testing download speed................................................................................
Download: 621.00 Mbit/s
Testing upload speed................................................................................................
Upload: 367.37 Mbit/s
Share results: http://www.speedtest.net/result/6687428141.png
Observe the last line which includes the URL of your test result. If I download that image its the one below :
Speedtest result on Linux
That’s it! But hey if you don’t want all this technical jargon, you can even use below one-liner to get speed test done right away.
Internet speed test using one liner in terminal
We are going to use a curl tool to fetch the above python script online and supply it to python for execution on the go!
Understand and learn about data center tier. The article explains the data center standardization matrix: tier 1 to tier 4 along with its eligibility criteria.
Data center tiers
Most of our readers are system administrators and surely come across term call data center tiers in their sysadmin life. This article will walk you through what is data center tiers? Different types of data center tiers, what is tier 1, tier 2, tier 3, and tier 4 data center? Which tier data center have maximum availability? etc.
All these might be interview questions for system architects at the beginner level. As a sysadmin its always good to know data center tiers so that you are well verse with your company infrastructure and can decide if that can really deliver on SLAs defined in your environment.
Without further delay, lets start with our topic.
What is data center tier?
Datacenter tier is the standardization matrix that defines overall performance, availability, fault tolerance capability, operating environment of a data center. It defines how the data center is fault-tolerant, how it can sustain to failures of various components, power, connectivity links, etc. It defines availability being offered for hosted servers.
Basically data center tier helps customers to determine which tier is best suitable for their application depending on the SLA requirement and data critical index they have. Mission-critical services should be hosted under a higher tier data center whereas less critical data should be hosted in lower-tier data centers. Obviously cost is another factor here too. As you go on high with tier, cost increases for hosting.
Different data center tiers
There are 4 data center tier standards defined by Uptime Institute. They are as below :
Tier 1: Non-redundant capacity and single power, connectivity distribution
Tier 2: Tier 1 feature + redundant capacity
Tier 3: Tier 2 features + Multiple independent power, connectivity distribution + onsite energy production system
Tier 4: Tier 3 features + All components are fault-tolerant, continuous cooling equipment.
A detailed list of requirements to be fulfilled by the data center to be eligible for specific tier is available here.
Data center tier deciding factors :
Datacenter to be eligible for certain tier it should complete certain criteria (as we saw above). There are many factors that affect/help in achieving those criteria. These factors are as below –
Datacenter design, location
Mechanical infrastructure design
Technology infrastructure design
Electric power distribution
Cables distribution
Network and internet connectivity distribution
Fire protection
Security in terms of soft security and physical security controls like biometric etc
Energy production, use, efficiency
Waste management
Environmental control and effects
Cooling management
Capacity management
Accepted downtime and availability tier wise
Tier 1: 99.671% uptime, 28.8 hours downtime per year
Tier 2: 99.749% uptime, 22 hours downtime per year
Tier 3: 99.982% uptime, 1.6 hours downtime per year
Tier 4: 99.995% uptime, 26.3 minutes downtime per year
That’s all I have to share with you about data center tier standards. Feel free to point out mistakes, suggestions, feedback in the comments section below.
Kerneltalks blog turned one today. This article crafts a year blog journey in info-graphics! Keep visiting us. Thank you!
Happy Birthday KernelTalks!
Yay! Happy Birthday KernelTalks!
Yup. The blog turned one today. It was slow but exponential growth for KernelTalks. Let me walk you through this one year journey with the info-graphic format below :
Step by step procedure to resolve “device eth0 does not seem to be present, delaying initialization.” error on Linux VM.
eth0 error on Linux vm
If you are working on VMware infrastructure when your Linux VM is hosted on it, you must have come across below error while bringing up Ethernet in Linux :
Bringing up interface eth0: Device eth0 does not seem to be present, delaying initialization.
root@kerneltalks # service network restart
Shutting down interface eth0:                              [  OK  ]
Shutting down loopback interface:                          [  OK  ]
Bringing up loopback interface:                            [  OK  ]
Bringing up interface eth0:  Device eth0 does not seem to be present, delaying initialization.
                                                           [FAILED]
In this article, we are going to resolve this error. First, let’s see the background of this error. This method works well on Red Hat, CentOS, Oracle Linux, etc.
This error comes up normally in VM which is cloned from other Linux VM or from the template. The root cause of this error is MAC address of eth0 which is same as the source (source VM or template) in its configuration file ifcfg-eth0. While as during boot NIC gets unique MAC address and it does not match with one in ifcfg-eth0.
So here are steps to resolve this error.
Step 1.
Remove file /etc/udev/ rules.d/70-persistent-net.rulesand reboot the server.
This ensures new fresh files to be generated at the next boot and get unique MAC assigned.
Step 2.
After reboot, confirm above file is generated again. It will look like :
root@kerneltalks # cat /etc/udev/rules.d/70-persistent-net.rules
# This file was automatically generated by the /lib/udev/write_net_rules
# program, run by the persistent-net-generator.rules rules file.
#
# You can modify it, as long as you keep each rule on a single
# line, and change only the value of the NAME= key.

# PCI device 0x15ad:0x07b0 (vmxnet3)
SUBSYSTEM=="net", ACTION=="add", DRIVERS=="?*", ATTR{address}=="00:50:56:99:3f:25", ATTR{type}=="1", KERNEL=="eth*", NAME="eth1"
Observe that new MAC is generated for eth1 (NAME="eth1"). Note down the MAC address from the file.
Step 3.
Now you have two choices :
Use eth1 as device name under ifcfg-eth0 config file.
Edit /etc/udev/ rules.d/70-persistent-net.ruleswith eth name as eth0
If you are choosing the first option then along with name change you need to change MAC.
If you are choosing the second option. Edit your ifcfg-eth0 located under /etc/sysconfig/network-scripts with new MAC address from above file. Also, since you made changes to /etc/udev/ rules.d/70-persistent-net.rules you have to again reboot the server. Rebooting the server here is important.
I would suggest going with the second choice since you will maintain naming conventions on your system. The first choice may create confusion to fellow sysadmins if you have more than one NIC on your server.
Step 4.
If you have used choice 1 i.e. using device name as eth1 under config file ifcfg-eth0 then you just need to restart network service and you should be all set.
root@kerneltalks # service network restart
Shutting down interface eth0:                              [  OK  ]
Shutting down loopback interface:                          [  OK  ]
Bringing up loopback interface:                            [  OK  ]
Bringing up interface eth0:                                [  OK  ]
If you have opted the second choice then reboot already taken care of things and your ethernet along with IP should be post-boot.
Learn how to transfer files between desktop and EC2 using WinSCP. Using key-based authentication, winSCP can be connected to EC2 to download/upload files from/to the server.
Transfer data to/from EC2 using winSCP
While working on the EC2 server hosted on AWS, one of the basic requirements you come across is to transfer data between your desktop/laptop and EC2 instance. Since EC2 uses key-based authentication, for beginners it’s hard to understand how to transfer data from desktop to EC2 cloud.
Normally, programs like WinSCP are used to transfer data between the Linux server and the windows machine. In this article we will walk you through how to add key-based authentication in WinSCP. Later how to download files from EC2 to the local machine.
Other EC2 related posts which might interest you :
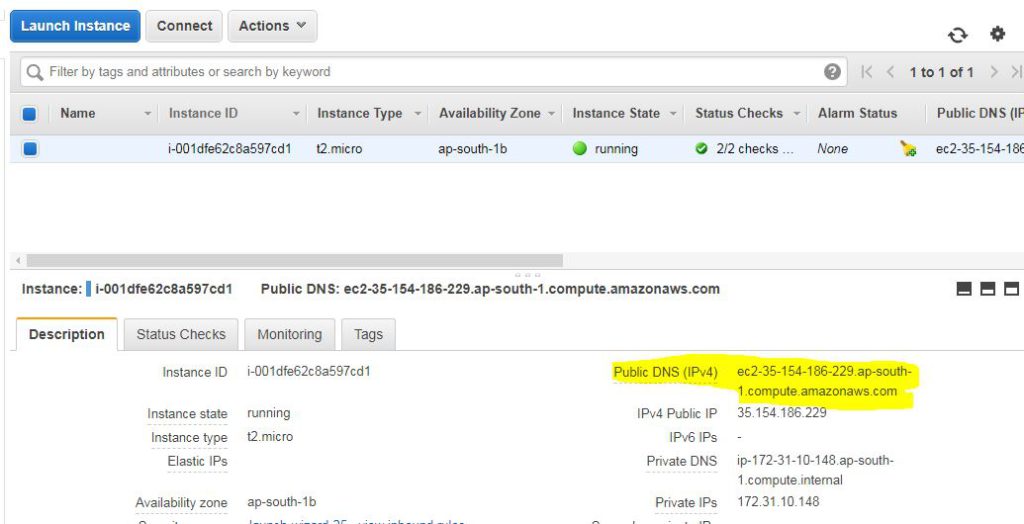
Make sure your EC2 instance is spun up. You have the Public DNS name of your EC2 instance. You can see it under instance description in your AWS EC2 console.
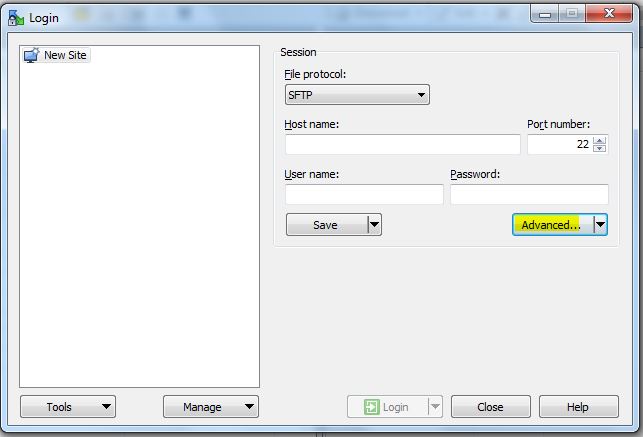
Open WinSCP tool. Click on Advanced to open settings of tool.
Open winSCP settings
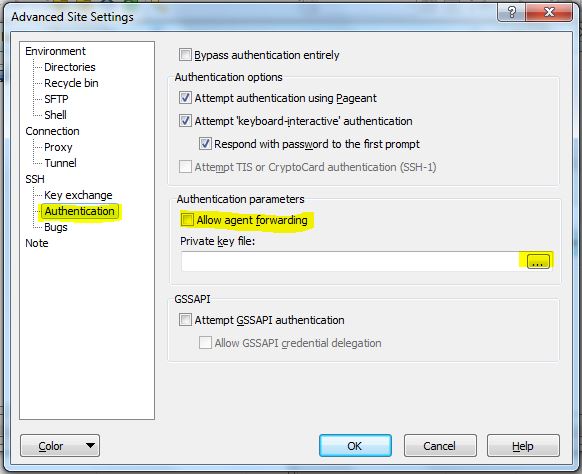
Under settings, click on Authentication under SSH in the left panel. This will open up authentication settings on the right panel.
Authentication settings in winSCP
Under, Authentication parameters tick ‘Allow agent forwarding‘ and browse your private key file in it. This private key file is key the same file you use to authenticate to EC2 when connecting via PuTTY
Click OK and close settings.
Step 3 : Connect
Copy public DNS of your EC2 instance, username as ec2-user for RedHat (different Linux distro has diff default logins in AWS. List of all is here) and hit connect. It will pop up to accept the key if you are connecting for the first time via WinSCP. Accept it and you will be connected to the EC2 server!
I have created small GIF which shows whole above process. Have a look .
Connect EC2 using winSCP
Now you can download or upload files from EC2 to local like you normally do!
While working on iptables, if you get confused about policies and you need to start afresh then you need to reset iptables to default settings. By default, I mean to set accept all policy and flush any existing configured rules from settings.
In this article, we will walk through a set of commands to reset iptables to default settings. This can also be treated as how to reset firewall in Linux like ubuntu, centos, Redhat, Debian, etc. It’s a pretty simple 2 steps process.
Step 1 : Set accept all policy to all connections
Using the below set of commands you will set accept rule for all types of connections.
Learn how to setup domain names in RedHat, Ubuntu, CentOS, Fedora like Linux servers. Also, see how to verify domain name in Linux and FQDN setup in Linux
Domain name in Linux
Many companies have an internal domain for their IT infrastructure. This needs its servers to be configured with a domain name. This will ensure all servers will have FQDN (Fully Qualified Domain Name). For example, server12 is hostname and server12.kerneltalks.com is its FQDN. In such setup, many tools, monitoring requires servers to be identified by FQDN only.
For such a scenario you have to configure the domain name for your Linux server. We will walk you through steps that need to be taken to the setup domain name on your Linux server.
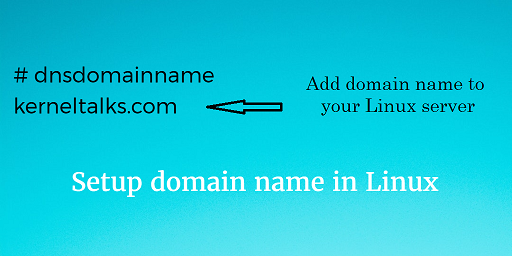
First of all, check if your server is having domain name already set up or not using below command :
root@server12 # dnsdomainname
kerneltalks.com
If you get output like above then your server is configured with the domain name. If your output is blank then you have to the setup domain name for your server.
Without further delay lets jump into steps to configure domain name.
Step 1.
How to setup FQDN in Linux?
First thing to be done is add FQDN to your hostname in /etc/hosts file.
Beginners guide on how to configure nameserver in Red Hat, CentOs, Fedora, Debian, Ubuntu or Suse Linux to resolve DNS queries.
Configure nameserver in Linux
Nameserver is the DNS server to which your machine query for name resolutions. This is pretty much important on servers facing the Internet or having an active internet connection or if your system is part of an organization where the internal domain name system is implemented for IT Infra. In this article, we will walk you through how to set up nameserver in your Linux machine
What is nameserver?
Its server which response to the queries normally domain name resolution. It’s like a phone directory, where you query name and you get phone number. Nameserver receives hostname or domain name in the query and responds back with IP address.
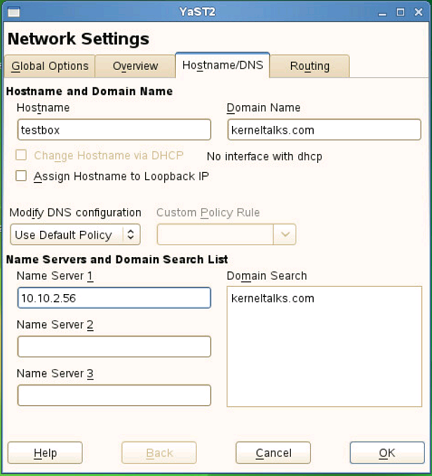
How to setup nameserver in Red Hat?
You need to open file /etc/resolv.conf in a text editor like vi or nano and add your name server IP in the below format.
You can use the same above same method to configure nameserver in CentOS, Debian, Fedora.
How to setup nameserver in Ubuntu?
Addition to /etc/resolv.conf file, in ubuntu, you can edit file /etc/network/interfaceswith the same above said information. The format remains the same.
Learn to install VMware tools in Linux VMs like RedHat, Suse, Debian, Ubuntu, CentOS, etc. The article includes screenshots, commands, and a complete installation log.
VMware tools installation on Linux
Even the cloud market is bursting nowadays, many corporations still prefer to have in-house Infra virtualization using technologies like VMware. A wide variety of Operating systems can be hosted on virtual machines created under it.
Linux servers like Red Hat, Ubuntu, Suse, Fedora are hosted on VMware infra. After fresh installation you will see warning under VMware console that VMware Tools are not installed on your guest machine. Like below :
VMware Tools is not installed on this virtual machine!
vmware tools warning
It is not mandatory to install these tools but recommended having them on the guest machine so that host and guest can communicate properly. As a result, your VMware console has more power, visibility over your guest machine.
In this article, we will walk through steps on how to install VMWare tools on Linux guest OS like Red Hat, Ubuntu, Kali, Suse, Debian, etc.
Step 1.
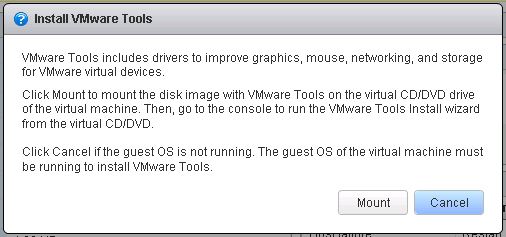
First make sure you have one empty CD-ROM drive attached with the guest machine. Click on the“Install VMware Tools” link in the warning shown above. That will be under the ‘Summary‘ tab of your virtual machine in the VMware console. This will pop up a message confirming to mount VMware tools cdrom on your guest OS.
Mounting VMware tools disc
Click ‘Mount‘ on the pop-up and it will mount VMware tools disc on your guest Linux machine. If you have VMware tools ISO, you can mount ISO as well.
Step 2.
Login to guest Linux machine and you will notice disc is automatically mounted on /media/VMware Tools. Verify it using df command.
root@kerneltalks # df -h
Filesystem                 Size  Used Avail Use% Mounted on
/dev/sr0                    71M   71M     0 100% /media/VMware Tools
If it’s not mounted automatically, you can mount it manually with below set of commands –
root@kerneltalks # mkdir /mnt/cdrom
root@kerneltalks # mount /dev/cdrom /mnt/cdrom
root@kerneltalks # df -h
Filesystem                 Size  Used Avail Use% Mounted on
/dev/sr0                    71M   71M     0 100% /mnt/cdrom
Once mounted confirm the content of discs are visible to you.
root@kerneltalks # cd "/media/VMware Tools"
root@kerneltalks # ll
total 71888
-r--r--r-- 1 root root 72162730 Feb 17  2016 VMwareTools-10.0.6-3560309.tar.gz
-r-xr-xr-x 1 root root     2012 Feb 17  2016 manifest.txt
-r-xr-xr-x 1 root root     1850 Feb 17  2016 run_upgrader.sh
-r-xr-xr-x 1 root root   687524 Feb 17  2016 vmware-tools-upgrader-32
-r-xr-xr-x 1 root root   757944 Feb 17  2016 vmware-tools-upgrader-64
It is important to copy files from disc to local directory. Since if you try to directly run things from the disc you may encounter permission related errors because the disc is mounted as read-only.
Step 3.
Copy installers in the local directory. Goto disc and copy tar file in it to local directory e.g. /tmp/vmware
root@kerneltalks  # cd vmware-tools-distrib
root@kerneltalks  # ll
total 488
-rw-r--r-- 1 root root 282475 Feb 17  2016 FILES
-rw-r--r-- 1 root root   2538 Feb 17  2016 INSTALL
drwxr-xr-x 1 root root    114 Feb 17  2016 bin
drwxr-xr-x 1 root root     18 Feb 17  2016 caf
drwxr-xr-x 1 root root     74 Feb 17  2016 doc
drwxr-xr-x 1 root root    598 Feb 17  2016 etc
drwxr-xr-x 1 root root    114 Feb 17  2016 installer
drwxr-xr-x 1 root root    158 Feb 17  2016 lib
drwxr-xr-x 1 root root     14 Feb 17  2016 vgauth
-rwxr-xr-x 1 root root    243 Feb 17  2016 vmware-install.pl
-rwxr-xr-x 1 root root 205571 Feb 17  2016 vmware-install.real.pl
Step 4.
Install VMware tools. The final step is to run the Perl script and install tools. It will ask you a couple of questions regarding directory structures, you can customize or just accept defaults.
All the below installation logs are minimized for the better reading experience. To view them, click on them to expand code.
root@kerneltalks # ./vmware-install.pl
Creating a new VMware Tools installer database using the tar4 format.

Installing VMware Tools.

In which directory do you want to install the binary files?
[/usr/bin]

What is the directory that contains the init directories (rc0.d/ to rc6.d/)?
[/etc/init.d]

What is the directory that contains the init scripts?
[/etc/init.d]

In which directory do you want to install the daemon files?
[/usr/sbin]

In which directory do you want to install the library files?
[/usr/lib/vmware-tools]

The path "/usr/lib/vmware-tools" does not exist currently. This program is
going to create it, including needed parent directories. Is this what you want?
[yes]

In which directory do you want to install the common agent library files?
[/usr/lib]

In which directory do you want to install the common agent transient files?
[/var/lib]

In which directory do you want to install the documentation files?
[/usr/share/doc/vmware-tools]

The path "/usr/share/doc/vmware-tools" does not exist currently. This program
is going to create it, including needed parent directories. Is this what you
want? [yes]

The installation of VMware Tools 10.0.6 build-3560309 for Linux completed
successfully. You can decide to remove this software from your system at any
time by invoking the following command: "/usr/bin/vmware-uninstall-tools.pl".

Before running VMware Tools for the first time, you need to configure it by
invoking the following command: "/usr/bin/vmware-config-tools.pl". Do you want
this program to invoke the command for you now? [yes]
Once it receives all the answers, installation begins –
Initializing...


Making sure services for VMware Tools are stopped.

Stopping VMware Tools services in the virtual machine:
   Guest operating system daemon:                                      done
   VMware User Agent (vmware-user):                                    done
   Unmounting HGFS shares:                                             done
   Guest filesystem driver:                                            done


Found a compatible pre-built module for vmci.  Installing it...


Found a compatible pre-built module for vsock.  Installing it...


The module vmxnet3 has already been installed on this system by another
installer or package and will not be modified by this installer.

The module pvscsi has already been installed on this system by another
installer or package and will not be modified by this installer.

The module vmmemctl has already been installed on this system by another
installer or package and will not be modified by this installer.
During installation it will ask you if you want to enable specific features or not. Submit your choices accordingly.
The VMware Host-Guest Filesystem allows for shared folders between the host OS
and the guest OS in a Fusion or Workstation virtual environment.  Do you wish
to enable this feature? [no]

Found a compatible pre-built module for vmxnet.  Installing it...


The vmblock enables dragging or copying files between host and guest in a
Fusion or Workstation virtual environment.  Do you wish to enable this feature?
[no]

VMware automatic kernel modules enables automatic building and installation of
VMware kernel modules at boot that are not already present. This feature can
be enabled/disabled by re-running vmware-config-tools.pl.

Would you like to enable VMware automatic kernel modules?
[no]


Disabling timer-based audio scheduling in pulseaudio.

Do you want to enable Guest Authentication (vgauth)? Enabling vgauth is needed
if you want to enable Common Agent (caf). [yes]

Do you want to enable Common Agent (caf)? [yes]
Finally it will detect and confirms GUI related parameters and builds boot image.
Detected X server version 1.6.5


Unable to detect guest resolution.


Please choose one of the following display sizes that X will start with:

[1]< 640x480
[2]  800x600
[3]  1024x768
[4]  1280x800
Please enter a number between 1 and 4:

[1] 2


X is running fine with the new config file.

Creating a new initrd boot image for the kernel.

Kernel image:   /boot/vmlinuz-3.0.101-63-default
Initrd image:   /boot/initrd-3.0.101-63-default
Root device:    UUID=6b24d38e-094f-471b-8215-aaf85a47fe8e (/dev/dm-2) (mounted on / as btrfs)
Resume device:  /dev/swapvg/swaplv
modprobe: Module crct10dif not found.
WARNING: no dependencies for kernel module 'crct10dif' found.
Kernel Modules: hwmon thermal_sys thermal processor fan scsi_mod libata libahci ahci scsi_transport_spi mptbase mptscsih mptspi ata_piix ata_generic vmxnet3

vmw_pvscsi vmxnet dm-mod dm-log dm-region-hash dm-mirror dm-snapshot scsi_dh scsi_dh_alua scsi_dh_emc scsi_dh_hp_sw scsi_dh_rdac libcrc32c zlib_deflate btrfs

usb-common usbcore ohci-hcd uhci-hcd ehci-hcd xhci-hcd hid usbhid linear crc-t10dif sd_mod crc32c
Features:       acpi dm block usb lvm2 btrfs resume.userspace resume.kernel
Bootsplash:     SLES (800x600)
51984 blocks
>>> Network: auto
>>> Calling mkinitrd -k /boot/vmlinuz-3.0.101-63-default -i /tmp/mkdumprd.XwBasPAr7V -f 'kdump network' -B  -s ''
Regenerating kdump initrd ...

Kernel image:   /boot/vmlinuz-3.0.101-63-default
Initrd image:   /tmp/mkdumprd.XwBasPAr7V
Root device:    UUID=6b24d38e-094f-471b-8215-aaf85a47fe8e (/dev/dm-2) (mounted on / as btrfs)
Resume device:  /dev/swapvg/swaplv
Dump device:    UUID=cbc439cd-3514-442e-bb42-b80f7823bdc1 (/dev/dm-3)
Boot device:    /dev/disk/by-uuid/9278503b-3bed-45b0-968a-6de4c9264d94 (/dev/sda1)
modprobe: Module crct10dif not found.
WARNING: no dependencies for kernel module 'crct10dif' found.
Kernel Modules: hwmon thermal_sys thermal processor fan scsi_mod libata libahci ahci scsi_transport_spi mptbase mptscsih mptspi ata_piix ata_generic vmxnet3

vmw_pvscsi vmxnet dm-mod dm-log dm-region-hash dm-mirror dm-snapshot scsi_dh scsi_dh_alua scsi_dh_emc scsi_dh_hp_sw scsi_dh_rdac libcrc32c zlib_deflate btrfs

usb-common usbcore ohci-hcd uhci-hcd ehci-hcd xhci-hcd hid usbhid af_packet linear nls_utf8 mbcache jbd ext3 crc-t10dif sd_mod crc32c
Features:       acpi dm block usb network lvm2 btrfs resume.userspace resume.kernel kdump
64862 blocks
Generating the key and certificate files.
Successfully generated the key and certificate files.
   Checking acpi hot plug                                              done
Starting VMware Tools services in the virtual machine:
   Switching to guest configuration:                                   done
   VM communication interface:                                         done
   VM communication interface socket family:                           done
   Guest operating system daemon:                                      done
   VGAuthService:                                                      done
   Common Agent:                                                       done
The configuration of VMware Tools 10.0.6 build-3560309 for Linux for this
running kernel completed successfully.
In the end, it presents you with the command to be used for VMware tools, greets and un-mount VMware tools disc (if it was mounted automatically in beginning)
You must restart your X session before any mouse or graphics changes take
effect.

You can now run VMware Tools by invoking "/usr/bin/vmware-toolbox-cmd" from the
command line.

To enable advanced X features (e.g., guest resolution fit, drag and drop, and
file and text copy/paste), you will need to do one (or more) of the following:
1. Manually start /usr/bin/vmware-user
2. Log out and log back into your desktop session; and,
3. Restart your X session.

Enjoy,

--the VMware team

Found VMware Tools CDROM mounted at /media/VMware Tools. Ejecting device
/dev/sr0 ...
VMware tools silent install on Linux VM
If you do not want to customize any of the answers asked during installation and want to go with all default values then you can use below command for starting non-interactive installation :
root@kerneltalks # ./vmware-install.pl -d default
This will install VMware tools in silent mode. No human interaction required and all default settings will be used for installation.
That’s it! You have successfully installed VMware tools on your Linux guest machine in VMware. You can now see IP details of guests in the VMware console. Also VMware tools status will be shown as ‘Installed and running‘.