Step by step procedure to install and configure Apache webserver in Linux. It also includes troubleshooting steps for errors during install.

In this tutorial, we are going to see how to install and configure Apache webserver in Linux. Apache is the most widely used web server that is developed and maintained by Apache Software Foundation. Its an open-source software and available for free to download and use.
What is webserver
The webserver is aimed to serve web pages to its clients. In our daily life websites, we visit from browsers that are hosted on webservers! Webserver commonly runs on port 80 (HTTP protocol) and 443 (https protocol, more secured). Communication between the web server and its client over https protocol is encrypted and hence secured.
Apache webserver
Apache webserver is an open-source web server developed by Apache Software Foundation. It is named as Apache HTTP Server Project and details can be viewed here. Apache webserver is also a part of the LAMP stack. Read more about LAMP here. Let’s see how to set up the Apache web server on the Linux box.
Apache installation
If you have configured YUM repositories then you can install ‘httpd’ package. If you don’t have YUM or apt-get repositories configured you can download the latest Apache source, compile and then install it.
Number of errors and their solutions :
Error: configure: error: APR not found.
Solution: Install apr and apr-utils packages (download here if you don’t have yum)
Error: configure: error: no acceptable C compiler found in $PATH
Solution: Install GCC package
Error: configure: error: pcre-config for libpcre not found.
Solution: Install pcre package (download here, unzip, /configure --prefix=/usr/local/pcre, make, make install)
Finally, you should be able to install it using : ./configure --prefix=/apache, make, make install (you can change /apache directory to diff where it will be installed)
Apache configuration
Post-installation you will have /var/www/html/ directory in which you should place your HTML pages which can be fetched from browser. httpd service will come to existence.
Read also : Let’s encrypt (free, open source) SSL configuration for Apache
If you keep files and directories in /var/www/html/ then its listing will be shown in a browser like this example we saw in another post. We will put below HTML file in /var/www/html/ for test :
# cat test.html
<html>
<body>
<h4>This webserver is installed by kerneltalks.com</h4>
</body>
</html>
Now once you make changes in the directory structure, restart httpd service. Verify httpd service is running and port 80 is listening.
# service httpd status
httpd (pid  27920) is running...
Now, try to fetch that page from browser. Use your server IP as website address i.e. http://IP/test.html

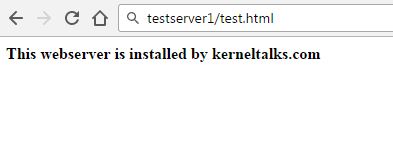
You will be greeted with such a page! Your webserver is up and running. Accepting and serving requests from browsers.
Apache config files
Apache configuration file located at /etc/httpd/conf/httpd.conf In this configuration file you can set your error file path, SSL certificate path, SSL cert key file path, port, IP (virtual hosts), access log path, etc. There is a lot more customization that can be done using this file but I stated only general tweaking parameters.
Apache log files can be found at :
/etc/httpd/logs/access_log: all access logs logged here./etc/httpd/logs/error_log: All errors logged here. They also include start-stop service messages.
How to start / stop Apache webserver
To start Apache webserver
# service httpd start
# service apache2 start   #If you are running Apache2
To stop Apache webserver
# service httpd stop
# service apache2 stop   #If you are running Apache2
How to load Apache2 modules
One of the common issues found is when the PHP module is not loaded into Apache webserver, .php links on webserver will download files in the browser instead of displaying them. To correct this you need to load the PHP module in Apache.
To load PHP or any other module in Apache, you need to add it in file /etc/sysconfig/apache2 in below line :
APACHE_MODULES="actions alias auth_basic authn_file authz_host authz_groupfile authz_core authz_user autoindex cgi dir env expires include log_config mime negotiation setenvif ssl socache_shmcb userdir reqtimeout authn_core php5"
Here you can see we are loading the php5 module in our Apache2 webserver. Then you need to restart Apache2 webserver. Once done, check if the PHP module is loaded or not. Use command apache2ctl -M to check loaded modules in Apache.
How to list Apache modules in Linux
 # apache2ctl -M
Loaded Modules:
 core_module (static)
 so_module (static)
 http_module (static)
 mpm_prefork_module (static)
 unixd_module (static)
 systemd_module (static)
 actions_module (shared)
 alias_module (shared)
 auth_basic_module (shared)
 authn_file_module (shared)
 authz_host_module (shared)
 authz_groupfile_module (shared)
 authz_core_module (shared)
 authz_user_module (shared)
 autoindex_module (shared)
 cgi_module (shared)
 dir_module (shared)
 env_module (shared)
 expires_module (shared)
 include_module (shared)
 log_config_module (shared)
 mime_module (shared)
 negotiation_module (shared)
 setenvif_module (shared)
 ssl_module (shared)
 socache_shmcb_module (shared)
 userdir_module (shared)
 reqtimeout_module (shared)
 authn_core_module (shared)
 php5_module (shared)
You can see our php5 module is loaded in Apache.
What is difference between Server Root and Document Root in Apache ?
Server root is where Apache executable binaries reside rather its an installation path for Apache. Whereas document root is where website pages reside i.e. from where webserver loads web pages. So, you can change Document Root if you don’t want to use default /srv/www/htdocs directory. You can change it to any directory where you keep your website pages.
Share Your Comments & Feedback: